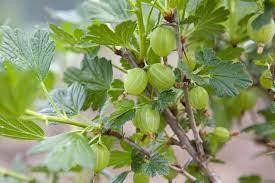
• Skip to primary navigation
  • Skip to main content

Haliburton County Master Gardeners

Gardening in Haliburton County

sign up
site search
  • Ask a Question
    • MG Questions Answered
  • Request a Consult
  • Resources
    • Garden with Nature
      • For Your Property Including Shorelines
      • Go Wild
      • Invasives
      • Native Plants & Native Shorelines
      • Sunny Sites
      • Trees
      • Woodland
    • Gardening for Guilty Pleasure
      • Perennials
      • Planning and Design
    • Growing Food
      • Fruits
      • Herbs
      • Native Edibles
      • Pruning and Other Practices
      • Vegetables
      • Soil
    • Native Plants
      • Selection of Native Plants for the Highlands
    • Zone 4 Challenges
      • Pests
      • Tips
      • Wildlife
    • Useful Links
      • Canoe Radio Podcasts
      • County Life Magazine
      • MGOI Website
      • Videos
  • Guidebook
  • About
    • How to Become a Master Gardener
  • What’s On
    • Events Calendar
    • Butterflyway Project
    • Stepping into Nature
  • Buy Local
  • Contact
  • Facebook logo
  • YouTube logo
  • Printer icon graphic

Growing Food

General Pruning Tips

March 21, 2023

When to Prune

The best time to prune most woody plants is during the cold season when they are dormant. If circumstances force you to prune later in the season you aren’t going to kill your plant.

Why Prune Plants in Late Winter?

they are free of leaves and you can see what you are doing
the plant energy isn’t wasted on new growth that is going to be loped off
they are least susceptible to infection at this time (there are exceptions)

Some Basics

  1. A tree grows from the top, from its leaders. A branch doesn’t move up a tree as it grows taller. The branches on a small tree will stay at the same height from the ground all its life. It will grow new branches higher up but the original branches will stay where they are.


2. Terms used in Tree and Shrub Pruning

Pruning Terms


Some Tips

  • Sterilize your pruning equipment in isopropyl alcohol after working on each plant.
  • The 4 D’s: prune out the dead, diseased, damaged and dysfunctional.
  • Most trees and most other plants do not require a lot of pruning– in fact, most of the time, pruning out the 4 D’s is all that is needed.
    Over pruning encourages water spouts (suckering) and effects root growth, growth that is essential to surving harsh climates.
  • Remove sucker growth from the base of the trunk and from the interior of the tree annually.
  • Any cuts that aren’t made flush to a trunk or branch should be made at least 2 cm (1”) above a bud and cut cleanly with sharp pruners or loopers.
  • Don’t stake a tree any longer than one year at which time it’s stable enough to stand on its own.
  • Keep mulch away from the trunk of the plant to prevent rot and rodent damage.
  • Use well-rotted manure, mulch or compost to nurture trees and shrubs placing it well away from the trunk or crown and concentrating it at the drip line. Over fertilizing with nitrites will inhibit flower budding and cause excess vegetative growth making plants vulnerable to pests. Over fertilized garden centre seedlings reared on chemicals may not survive normal planting conditions.

Pruning Trees (apple, pear)

Full Size Standard Trees (under 10 years of age)

  • At maturity a pruned apple or pear tree should be Xmas tree shaped. Identify your central leader. Remove double leaders.
  • Choose your lowest branch – in the Haliburton Highlands make sure it is above the snow line (1 metre min.) to avoid ice damage and breakage. Now prune all branches below it.
  • Now prune according to the 4 Ds.
  • If there are multiple branches you may want to thin some out. You want the tree to be well balanced so choose main branches on all sides first. (mark with ribbon).
  • If you need to do further pruning, follow the branch to the trunk and cut on a 45 degree angle above the branch collar (to optimize healing). Avoid pruning branches larger than 8cm (3”). Prune out branches with wide or narrow crotches. The best crotch angle (roughly the 2 o’clock or 10 o’clock angle from the center of the tree). Wider angles can break when laden with fruit and narrower angles lead to bushy growth and fruit that is too high to pick.
    Prune back any lower branches that arch and grow taller than the central leader.
  • You can choose at this last stage to give the tree an overall haircut by heading back the long gangly stems to encourage shorter, stouter branches. Cut back 20-30% of last year’s growth. (Avoid creating bushy starbursts in unwanted places)
  • Thinning out young fruit: If you have a particularly prolific tree and are concerned that a branch laden with fruit will break and you want larger but fewer fruit and good flower bud development for the next season consider thinning out the fruit. Begin thinning the fruit early when it is 1.5 cm in diameter. Starting at one end of a branch remove fruit, leaving one fruit every 15 – 20 cm (6-8”). Any earlier and you might remove leaf buds by mistake. (This fruit thinning technique applies to pommes and stone fruits.)


Pruning Standard Trees

Check out our Heritage Apple Project here!


Pruning Stone Fruit Trees (plum, cherry, apricot)

Stone fruits are native to warmer areas of the world and growing them in Zone 4 is a challenge. They bloom earlier in the spring and can be damaged by our late frosts. They are shallow rooted, prone to drought and disease and harvest is delayed to allow for maximum sweetening. (The sugar content in stone fruit doesn’t increase after harvest.) If you like cherries try growing a Shrub Cherry instead of a tree. They are hardy and blight resistant.
Stone fruit trees are pruned in spring from bud swell to petal drop to avoid infection from canker disease. The central leader is cut to encourage an open vase shape for maximum light penetration.

Open Center Pruning


Notes on Trees

  • Although there are newer more cold hardy rootstocks of dwarf and semi-dwarf trees a ‘standard’ height tree will be dependably cold hardy and live for decades. If you’ve ever walked through an old abandoned orchard the trees left standing are standard height heritage apples.
  • A tree will develop a stronger, more extensive root system if it has a fuller crown. Limit pruning at the time of planting to structural training and the removal of damaged branches only. Any removal of branches will reduce the capacity of the tree to produce food in the leaves and provide energy for above and below ground growth.
  • In most soils, the vast majority of trees’ fibrous, absorbing roots are in the top eight inches of soil. Roots grow where conditions are best for root growth and where water and oxygen are available.
  • Taproots are very uncommon in mature trees. If taproots do develop, they usually will be forced into horizontal growth when they encounter bedrock or hard subsoils beneath the surface. The entire root systems of most trees can be found within three feet of soil. The spread of the root system however, can be very extensive, often extending 2-3 times the spread of the crown.

For more information go to: http://www.hardyfruittrees.ca/tutorials/2014/01/20/how-to-prune-a-fruit-tree

How To Prune Your Fruit Trees


Pruning Grapevines

Grapevines have to be aggressively pruned in order to yield any fruit. The vine will only produce fruit on the new branches of the year. If you let the vine make five meters of branches every year, after 3 years your vine will have to feed 15 meters of branches in order to reach the branch’s extremity where the fruit is.

Goals of Pruning

  1. To obtain multiple clusters of fruit
  2. To train the vine along a trellis, fence or conventional 2 wire structure.

When to Prune

Late fall or early spring

Types of Pruning

  1. To tame an overgrown Grapezilla
  2. Young plants and annual maintenance pruning

The Technique

  1. Choose the main stem. It is the strongest stem that comes out of the ground. Then cut all the other stems coming out of the ground, just above the ground.
  2. On the main stem, you will have to choose 4 branches. Choose the two strongest branches from both the left and right sides. If supporting your vines with two parallel wires (like shown in the image below) choose your branches so that each of them will easily hang on the wire. Using flagging tape is a great help in identifying the branches to keep. It will also help you to avoid cutting the good branches.
  3. Cut all the branches, except for the 4 chosen, to 1cm from the main stem.
  4. Finally, on each of the 4 branches, keep two buds and cut off the branch between the second and third bud.

Pruning Grapevines


About Kiwi

  • Male and female flowers are born on different plants, so both males and females must be planted in roughly a 1:6 ratio of males to females.
  • The plants often take several years to mature and usually do not bear fruit until they are 5 to 9 years old.
  • Although the plants are extremely winter hardy–tolerating temperatures as low as -30°F–they develop shoots early in the spring that are extremely sensitive to frost. In most years, there may be some shoot “burning” due to frost, although the plant usually survives, regrows, and fruits. If flowers are frosted, fruit will not develop that year.
  • Hardy kiwi are extremely vigorously growing vines that require a substantial supporting trellis.

Kiwi Trellis


Pruning Kiwi Vine the First Year

  1. For the first year focus on straight growth and a strong framework. Tie the vine loosely to the post and keep it growing straight upward. Don’t allow it to twirl around the post. Remove all side branches until the vine reaches the top of the post.
  2. Cut out the top of the vine a few inches below the top of the post and encourage side shoots that grow laterally along the wires. Winter is the best time for pruning kiwi vine side branches along the wires. Cut them back to a point where the stems are about 1/4-inch in diameter. If the vine didn’t form good side branches at the top, cut the main trunk back by about 2 feet and try again next year.
  3. After the first year, focus on building strong lateral growth along the wires. Lead the branches near the top of the vine to the wires and fasten them in place every 18 to 24 inches. Cut the vine to keep it from extending beyond the wires. Remove shoots that are twisting around other shoots or taking off in the wrong direction.

Kiwi Pruning


How to Prune an Overgrown Kiwi

  1. Remove all of the branches that wind around the kiwi trellis. Also, remove vine sections wound around other branches or nearby plants. Using sharp, sterilized pruners make a clean cut about one inch (2.5 cm.) from the main vine.
  2. The next step is to trim out cross branches. This includes branches growing over or crossing other branches. Also, trim out shoots growing straight out from the stem since these will not bear fruit.
  3. Select a principal stem for the kiwi vine and train this straight up a trellis. It should get some 6 feet long. Just beyond this point, allow two lateral side shoots to grow over the trellis. Prune these back to three buds, then remove all other lateral shoots.

Read more at Gardening Know How: https://www.gardeningknowhow.com/edible/fruits/kiwi/pruning-kiwi-vines.htm
https://extension.psu.edu/hardy-kiwi-in-the-home-fruit-planting

Filed Under: Gardening for Guilty Pleasure, Planning and Design, Pruning and Other Practices

Pruning and Maintenance of Raspberry Canes

November 5, 2022

General Care:

  • Mulch to conserve moisture and reduce weeds.
  • Water 1 inch per week from spring until after harvest.
  • Keep bushes tidy by removing “suckers” that grow outside of designated rows. This prevents loss of nutrients used to grow the canes which will reduce berry size of next years crop.

Pests & Diseases:

  • June through August watch for spider mites and Japanese beetles. Also susceptible to cane borers and powdery mildew.
  • Rabbits will eat canes in the winter. Prevent with chicken wire fence.

Ever-bearing Raspberries AKA Fall-bearing Raspberries

  • Fruit on first year of growth.
  • After fruiting in fall, cut all canes to the ground. No pruning is required during the growing season.
  • Clean up all debris to avoid disease and pests over winter.
  • NOTE: To harvest both a fall and following summer crop, do not remove the primocanes that produced the fall crop. Prune them back in spring to 12 inches to the last visible node that had fruit and cut off dead tips.

Summer Fruiting Raspberries

  • Produces fruit on 2-year-old canes.
  • In the fall, cut canes to the ground that produced berries. These older canes are brown. Do not cut the new green canes as they will fruit next year.

4 Easy steps to Pruning Red Raspberries:

  1. Remove last year’s floricanes
  2. Narrow the row width to 1.5 – 2 feet
  3. Cut out the weaklings. You only want the tallest, thickest and healthiest looking canes left.
  4. Attach remaining canes to a V-shaped trellis. This design has 2 parallel wires spaced 3 feet apart and approximately 4 feet high. Attach canes to the trellis using twine. Tie canes so half are on one side of the row and half on the other side, approximately 1 every 4 inches. This promotes air circulation and encourages new growth in the center for next year. In addition, fruit will be on the outside for easier picking.

Raspberry Cane Pruning


Raspberry Canes Before and After Pruning


Filed Under: Fruits, Growing Food, Pruning and Other Practices

Pruning and Maintenance of Gooseberry Bushes

September 15, 2022

General Care:

  • Mulch to conserve moisture and reduce weeds.
  • Water 1 inch per week from spring until after harvest.
  • Every 3-4 years fertilize in early spring with a balanced fertilizer (10-10-10).
  • Can be grown in containers, trained up a trellis, pruned into small trees or maintained as a small shrub.

NOTE: Very sharp thorns. Wear gloves when handling and picking berries.

Pests & Diseases:

  • Susceptible to powdery mildew and fungus.

Winter/Early Spring Pruning Steps (bush still dormant):

  1. Remove dead and diseased wood.
  2. Remove tangled, crossed, overcrowded or branches touching the ground.

Branches that are left, make the following cuts just above an outward facing bud:

  1. Cut back the previous seasons grown by half.
  2. Cut back side branches between 1 and 3 buds from the base of the shoot.
  3. Remove any suckers growing away from the main stem.

NOTE: For established plants, remove canes over 4 years old. Ideal bush has about a dozen canes at any one time, half being new shoots and other half a mix of 2- and 3-year-old canes.

Summer Pruning (mid-June):

  • Pruning of new growth will improve air circulation. Shorten new growth tips to 5 leaves.


Gooseberry Bush


How to Prune a Gooseberry Bush


Filed Under: Fruits, Growing Food, Pruning and Other Practices

Three Invasive Species to Avoid When Planning your Garden

July 29, 2022

Purple Loosestrife

Scientific Name: Lythrum salicaria L.

Common Name: Purple Loosestrife

Family: Lythraceae (Loosestrife)

Type of Plant: Herbaceous Perennial

Usage: Ornamental

Identifying Characteristics:

Stems & roots: Stout plant, erect (24-48in); 4 angled stem can be smooth to fuzzy; long, well-established tap root

Leaves: Smooth, opposite (2 per node) or whorled (3 per node); narrow to narrowly oblong and heart shaped at base; 1.25-4 in long, attach directly to stems; upper leaves & those in the inflorescence alternate (1/node) & smaller than lower leaves

Flowers: Magenta – pink, tightly clustered, dense, terminal spikes from 4-20in; sepals united into a column with 8-12 prominent green veins & ending in several, long, thin, pointed lobes; 5-7 petals approx. 1/4in long; several stamens & 1 pistil; small seedpod. Bloom late June – mid Sept. Many garden species previously thought to be sterile can produce seeds by cross pollination with wild & other species, increasing the opportunities for spreading

Habitat: In the wild – wetlands, sedge meadows, open bogs. Can also occur along streams, riverbanks, lake shores. Opportunistic in areas with recent soil disturbance. Grows best in highly organic soils in full sun

Invasive Potential: Introduced from Europe. 2.7 million seeds per plant annually, highly invasive in wetland areas through wind, birds, animals & humans. Readily establishes itself, crowding out native species. Decrease in biodiversity has far reaching ecological implications including displacing plants & animals, eliminating food & shelter for wildlife, degrading native wetlands, reducing habitat for waterfowl. Native to Eurasia

Control: No effective method except in small, localized growth area where it can be intensively managed. Isolated areas, uproot plant by hand ensuring the removal of all parts of plant including all roots

Other methods of control: cutting, burning where permitted, herbicide application although herbicides can destroy other nearby plants

Biological control using root weevil (Hylobius transversovittatus), 2 specie

s leaf eating beetles (Galerucella pusilla & Galerucella calmariensis) have been approved by Canadian government. Research indicate there is little chance of permanent host transfer as these insects only feast on purple loosestrife

Recommendations: Recommended to dig all cultivars of Purple Loosestrife from the landscape and, according to the Manitoba Purple Loosestrife Project, can best be replaced with Spiked Gayfeather (Liatrus); a native plant with pink, purple or white flowers that is an environmentally safe perennial. It requires full sun to part shade, height up to 1.5-2.5m, hardy to CDA zone 3; blooms midsummer to Sept


Tartarian Honeysuckle

Scientific Name: Lonicera tatarica

Common Name: Tartarian Honeysuckle

Family: Caprifolaceae (Honeysuckle)

Type of Plant: Flowering Deciduous Shrub

Usage: Ornamental

Stems & roots: Woody, multi-stemmed, upright 2-5m; Branches thin, smooth, becoming hollow; Dicotyledon; bark turns pale grey & shreds with age

Leaves: Opposite, ovate, 3-6cm long, short-stalked & blue-green; Smooth, hairless, bluish-green leaves

Flowers: Usually in 2 pairs developing in axils of leaves at end of branches; 2 leaflets beneath each bud pair, 2 sepals above leaflets; Petals pink to crimson, tubular, 2-lipped, 7-20mm long, fragrant. Blooms May-June. Fruit – abundant berries 3mm diameter, joined at base, ripening orange to red that are available in winter for the birds & other wildlife

Habitat: Adaptable to wide range of habitat; open woods, ravines, woodland edges; prefer moist, sunny areas

Invasive Potential: Moderately invasive in Ontario. Replaces native understory species & ground flora thereby changing vegetation structure; impedes forest seedling & natural tree regeneration; spread by birds & mammals dispersing seed. Native Eastern Asia

Control:
Mechanical: less dense infiltrations – pull ensuring all roots removed
Chemical: systemic herbicides such as Roundup are most effective. Another method is to cut off near ground level & apply herbicide
Biological: There are no current biological control methods available
Recommendations: As with most invasive plants it is best to remove and replace. To contain remove seedlings annually as they appear. Widespread dispersion by birds limits effectiveness. Replacement with North American natives such as Spice bush (Lindera benzoin) – hardy to CDA zone 5 or Viburnum – hardy to CDA zone 3


Glossy Buckthorn

Scientific Name: Rhamnus frangula L.

Common Name: Glossy Buckthorn

Family: RHAMNACEAE (Buckthorn)

Type of Plant: RBC site consider this plant a deciduous tree but many sites consider it a flowering deciduous shrub

Usage: Ornamental

Identifying Characteristics:
Stems & roots: Most often grow in large shrub habit with a few to several stems shooting up from base; shrubs spreading, loosely branched crowns; Bark grey – brown with prominent, lighter-coloured lenticels (pores in the stem of a woody plant allowing exchange of gases between the plant and the exterior)*. Unusual winter appearance with naked, hairy terminal buds & appealing curved twigs with closely-spaced, prominent leaf scars giving the twigs a bumpy outline against a white snowy backdrop. Tree habit reaches 6-9m high and 26cm diameter

Leaves: Thin, glossy, ovate or elliptic leaves, 3.8-7.6cm long; upper leaf surface shiny; lower surface hairy or smooth with margins that are not toothed – a distinguishing feature from the similar common buckthorn

Flowers: Yellow-green, 4 petals develop in clusters of 2-6 near base of petioles. Plant are dioecious (male & female sex organs on separate plants). Fruits small, black berries 0.6cm in diameter appear singly or in small groups in leaf axils. Fruit is poisonous except to European Starling – primary agent responsible for the spread

Habitat: Prefers range of wetland areas such as marshes and bogs but can grow in upland habitats such as forest, wood edges & old fields. In Ontario, primarily near larger populations

Invasive Potential: Invasive locally in Southern & Eastern Ontario. Rapid spread & ability to invade native wetland areas suggest this will become a serious threat in the future. Detrimental effects include: outcompeting native plants for nutrients, light & moisture; degrading wildlife habitat, serving as host to pests such as crown rust fungus

Control:
Mechanical: Remove isolated plants early before seed production, prescribed burns if permitted by law (may need to do this for several years);
Chemical Control: Best during fall season to lessen risk of affecting non-target plants;
Biological Control: No current biological control methods
Recommendations: As with most invasive plants it is best to remove and replace. As with the Glossy Buckthorn, replacement with same North American natives such as Spice bush (Lindera benzoin) – hardy to CDA zone 5 or Viburnum – hardy to CDA zone 3 is recommended


Resources:
* Life Sciences & Allied Applications / Botany definition
Invasive Plants of the US: Plant Conservation Alliance’s Alien Plant Working Group: Environment of Canada: Royal Botanical Gardens: Ontario Food & Agriculture: Ministry of Agriculture, Food & Rural Affairs: Ontario Federation of Anglers & Hunters: Invading Species: Ducks Unlimited; Talk About Wildlife; Alberta:

Filed Under: Garden with Nature, Gardening for Guilty Pleasure, Invasives, Native Plants, Planning and Design, Pruning and Other Practices

Edible Flowers

June 4, 2022

Flowers are not just pretty faces. Adding them to food can give your cuisine flair. But don’t just chow down on any flower. There are probably poisonous plants in your own garden or home. So that this topic doesn’t get confusing, no poisonous plants will be named in this article. Incidentally there are far too many to mention. An interesting fact is that what may be poisonous to people may not be to a cow, dog or deer and vice versa. Often only part of a plant is poisonous; perhaps the seeds or sap or root. Some plants are dangerous just to contact. So don’t eat anything unless you are absolutely certain of its identity and that it is edible. This is a good rule to follow if you are foraging in the wild too. Should someone ingest an unknown plant, determine the amount eaten and pick a sample of the plant. Telephone Poison Control. The telephone number is on the first page of the Bell Telephone Book (1 800 268-9017).


Edible flowers are fun and add zest when used even if just as a garnish. Pick only from a source that you know is clean of pesticides or herbicides. Roadsides are suspect. Often you must pick the floret out of the flower head (e.g. lilacs, calendula). First you should taste your flower to determine if it’s savoury or sweet or perhaps tasteless! Here follows a list of very well-known flowers that are edible, listed by season, from spring to fall.


Common Blue Violets – Very hardy and can take over your lawn but they are pretty. Crystallize them in sugar and then stick them onto sugar cubes for serving an elegant tea. (Paint with egg white and cover in sugar & let dry) or  use them fresh to garnish a dessert like rice pudding or baked custard when serving.

Edible Flowers

Pansies (Johnny Jump-ups) – Those little faces look great in green salad or chopped up to give the salad colour. They are sweet enough to garnish desserts as well.

Lilacs – Pull the florets from the head and taste them. Many modern hybrids might not have much flavour. Wild lilacs are very sweet. (Remember, from childhood, sucking on honeysuckle or purple clover?) Lilac florets could decorate a dish of vanilla ice cream to make it special.

Chive flowers – A nice touch for floating on tomato soup or in a salad. Be daring; do it. They taste exactly like chives.

Daylilies – These flowers are coarser than others mentioned. There are so many varieties you must taste them as some are sweet and some savoury like green bean flavour. Remove the stigma and flower base. Unopened buds can be used too.  Cook them in stir fry.

Squash blossoms (zucchini, pumpkin, or squash (species)) Male flowers bloom first. You might as well cook them until the female blossoms come along. Lightly battered and fried is one way to serve them.

Nasturtiums – spicy leaves and pretty flowers for salads. The seeds can be pickled & used as capers.

Try baking too!  Click here for our Lavender Cookie Recipe.

Filed Under: Growing Food, Native Edibles

Spring is coming, and so is the Asparagus!

March 29, 2022

Filed Under: County Life Magazine, Growing Food, Vegetables

  • « Go to Previous Page
  • Page 1
  • Page 2
  • Page 3
  • Go to Next Page »

coordinator@haliburtonmastergardener.ca

privacy policy

Haliburton County Development Corporation logo


HCMG logo
Member Login
  • Ask a Question
  • Resources
  • About
  • News & Events

Follow us on YouTube badge

  • Newsletter Signup
  • Contact
  • Buy Local

© 2025 HaliburtonMasterGardener.ca   •   Website Development by TechnicalitiesPlus Inc.