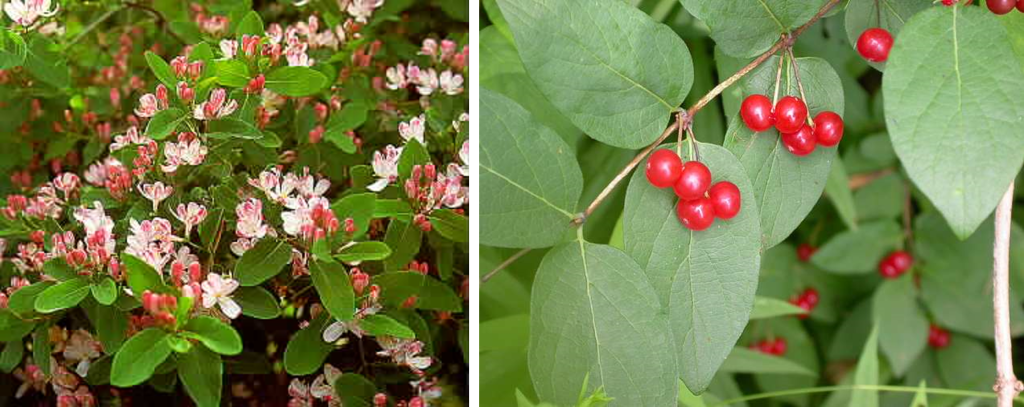
• Skip to primary navigation
  • Skip to main content

Haliburton County Master Gardeners

Gardening in Haliburton County

sign up
site search
  • Ask a Question
    • MG Questions Answered
  • Request a Consult
  • Resources
    • Garden with Nature
      • For Your Property Including Shorelines
      • Go Wild
      • Invasives
      • Native Plants & Native Shorelines
      • Sunny Sites
      • Trees
      • Woodland
    • Gardening for Guilty Pleasure
      • Perennials
      • Planning and Design
    • Growing Food
      • Fruits
      • Herbs
      • Native Edibles
      • Pruning and Other Practices
      • Vegetables
      • Soil
    • Native Plants
      • Selection of Native Plants for the Highlands
    • Zone 4 Challenges
      • Pests
      • Tips
      • Wildlife
    • Useful Links
      • Canoe Radio Podcasts
      • County Life Magazine
      • MGOI Website
      • Videos
  • Guidebook
  • About
    • How to Become a Master Gardener
  • What’s On
    • Events Calendar
    • Butterflyway Project
    • Stepping into Nature
  • Buy Local
  • Contact
  • Facebook logo
  • YouTube logo
  • Printer icon graphic

Gardening for Guilty Pleasure

Pruning and Maintenance of Rose Bushes

July 4, 2024

General Care:

  • Mulch to conserve moisture and reduce weeds.
  • Water 1 inch per week from spring until after harvest.
  • Roses are heavy feeders.
  • Spring: Fertilize with a slow release, balanced fertilizer.
  • Throughout season: Feed every 4 weeks.
  • Late summer, early fall: Stop fertilizing 6 – 8 weeks before frost date in preparation for winter.
  • NOTE: Very sharp thorns. Wear gloves when handling.

Pests & Diseases:

  • Susceptible to rose borers, powdery mildew, and fungus.

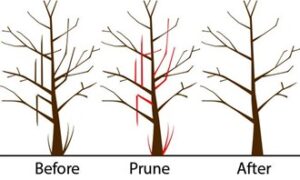
Late Winter/Early Spring Pruning Steps (start of new growth):

  • Remove all remaining leaves.
  • Prune dead wood back to the base.
  • Prune out crossing branches. Ideally create an open vase-like shape to increase air circulation.
  • Remove thin and weak growth (anything thinner than a pencil).
  • Shape the remaining canes into desired shape by cutting ¼” – ½” above an outward facing bud, at an angle sloping away from the bud.
  • Dispose of any leaves and waste to prevent spread of disease.

Fall Pruning (after killing frost):

  • Prune only as needed for winter preparation.
  • Trim longer stems to keep from snapping in winter storms.
  • Trim crossed branches to prevent rubbing.
  • Remove dead/diseased branches and foliage. 


Rose Bush Pruning Diagram


Filed Under: Gardening for Guilty Pleasure, Perennials, Planning and Design, Pruning and Other Practices

General Pruning Tips

March 21, 2023

When to Prune

The best time to prune most woody plants is during the cold season when they are dormant. If circumstances force you to prune later in the season you aren’t going to kill your plant.

Why Prune Plants in Late Winter?

they are free of leaves and you can see what you are doing
the plant energy isn’t wasted on new growth that is going to be loped off
they are least susceptible to infection at this time (there are exceptions)

Some Basics

  1. A tree grows from the top, from its leaders. A branch doesn’t move up a tree as it grows taller. The branches on a small tree will stay at the same height from the ground all its life. It will grow new branches higher up but the original branches will stay where they are.


2. Terms used in Tree and Shrub Pruning

Pruning Terms


Some Tips

  • Sterilize your pruning equipment in isopropyl alcohol after working on each plant.
  • The 4 D’s: prune out the dead, diseased, damaged and dysfunctional.
  • Most trees and most other plants do not require a lot of pruning– in fact, most of the time, pruning out the 4 D’s is all that is needed.
    Over pruning encourages water spouts (suckering) and effects root growth, growth that is essential to surving harsh climates.
  • Remove sucker growth from the base of the trunk and from the interior of the tree annually.
  • Any cuts that aren’t made flush to a trunk or branch should be made at least 2 cm (1”) above a bud and cut cleanly with sharp pruners or loopers.
  • Don’t stake a tree any longer than one year at which time it’s stable enough to stand on its own.
  • Keep mulch away from the trunk of the plant to prevent rot and rodent damage.
  • Use well-rotted manure, mulch or compost to nurture trees and shrubs placing it well away from the trunk or crown and concentrating it at the drip line. Over fertilizing with nitrites will inhibit flower budding and cause excess vegetative growth making plants vulnerable to pests. Over fertilized garden centre seedlings reared on chemicals may not survive normal planting conditions.

Pruning Trees (apple, pear)

Full Size Standard Trees (under 10 years of age)

  • At maturity a pruned apple or pear tree should be Xmas tree shaped. Identify your central leader. Remove double leaders.
  • Choose your lowest branch – in the Haliburton Highlands make sure it is above the snow line (1 metre min.) to avoid ice damage and breakage. Now prune all branches below it.
  • Now prune according to the 4 Ds.
  • If there are multiple branches you may want to thin some out. You want the tree to be well balanced so choose main branches on all sides first. (mark with ribbon).
  • If you need to do further pruning, follow the branch to the trunk and cut on a 45 degree angle above the branch collar (to optimize healing). Avoid pruning branches larger than 8cm (3”). Prune out branches with wide or narrow crotches. The best crotch angle (roughly the 2 o’clock or 10 o’clock angle from the center of the tree). Wider angles can break when laden with fruit and narrower angles lead to bushy growth and fruit that is too high to pick.
    Prune back any lower branches that arch and grow taller than the central leader.
  • You can choose at this last stage to give the tree an overall haircut by heading back the long gangly stems to encourage shorter, stouter branches. Cut back 20-30% of last year’s growth. (Avoid creating bushy starbursts in unwanted places)
  • Thinning out young fruit: If you have a particularly prolific tree and are concerned that a branch laden with fruit will break and you want larger but fewer fruit and good flower bud development for the next season consider thinning out the fruit. Begin thinning the fruit early when it is 1.5 cm in diameter. Starting at one end of a branch remove fruit, leaving one fruit every 15 – 20 cm (6-8”). Any earlier and you might remove leaf buds by mistake. (This fruit thinning technique applies to pommes and stone fruits.)


Pruning Standard Trees

Check out our Heritage Apple Project here!


Pruning Stone Fruit Trees (plum, cherry, apricot)

Stone fruits are native to warmer areas of the world and growing them in Zone 4 is a challenge. They bloom earlier in the spring and can be damaged by our late frosts. They are shallow rooted, prone to drought and disease and harvest is delayed to allow for maximum sweetening. (The sugar content in stone fruit doesn’t increase after harvest.) If you like cherries try growing a Shrub Cherry instead of a tree. They are hardy and blight resistant.
Stone fruit trees are pruned in spring from bud swell to petal drop to avoid infection from canker disease. The central leader is cut to encourage an open vase shape for maximum light penetration.

Open Center Pruning


Notes on Trees

  • Although there are newer more cold hardy rootstocks of dwarf and semi-dwarf trees a ‘standard’ height tree will be dependably cold hardy and live for decades. If you’ve ever walked through an old abandoned orchard the trees left standing are standard height heritage apples.
  • A tree will develop a stronger, more extensive root system if it has a fuller crown. Limit pruning at the time of planting to structural training and the removal of damaged branches only. Any removal of branches will reduce the capacity of the tree to produce food in the leaves and provide energy for above and below ground growth.
  • In most soils, the vast majority of trees’ fibrous, absorbing roots are in the top eight inches of soil. Roots grow where conditions are best for root growth and where water and oxygen are available.
  • Taproots are very uncommon in mature trees. If taproots do develop, they usually will be forced into horizontal growth when they encounter bedrock or hard subsoils beneath the surface. The entire root systems of most trees can be found within three feet of soil. The spread of the root system however, can be very extensive, often extending 2-3 times the spread of the crown.

For more information go to: http://www.hardyfruittrees.ca/tutorials/2014/01/20/how-to-prune-a-fruit-tree

How To Prune Your Fruit Trees


Pruning Grapevines

Grapevines have to be aggressively pruned in order to yield any fruit. The vine will only produce fruit on the new branches of the year. If you let the vine make five meters of branches every year, after 3 years your vine will have to feed 15 meters of branches in order to reach the branch’s extremity where the fruit is.

Goals of Pruning

  1. To obtain multiple clusters of fruit
  2. To train the vine along a trellis, fence or conventional 2 wire structure.

When to Prune

Late fall or early spring

Types of Pruning

  1. To tame an overgrown Grapezilla
  2. Young plants and annual maintenance pruning

The Technique

  1. Choose the main stem. It is the strongest stem that comes out of the ground. Then cut all the other stems coming out of the ground, just above the ground.
  2. On the main stem, you will have to choose 4 branches. Choose the two strongest branches from both the left and right sides. If supporting your vines with two parallel wires (like shown in the image below) choose your branches so that each of them will easily hang on the wire. Using flagging tape is a great help in identifying the branches to keep. It will also help you to avoid cutting the good branches.
  3. Cut all the branches, except for the 4 chosen, to 1cm from the main stem.
  4. Finally, on each of the 4 branches, keep two buds and cut off the branch between the second and third bud.

Pruning Grapevines


About Kiwi

  • Male and female flowers are born on different plants, so both males and females must be planted in roughly a 1:6 ratio of males to females.
  • The plants often take several years to mature and usually do not bear fruit until they are 5 to 9 years old.
  • Although the plants are extremely winter hardy–tolerating temperatures as low as -30°F–they develop shoots early in the spring that are extremely sensitive to frost. In most years, there may be some shoot “burning” due to frost, although the plant usually survives, regrows, and fruits. If flowers are frosted, fruit will not develop that year.
  • Hardy kiwi are extremely vigorously growing vines that require a substantial supporting trellis.

Kiwi Trellis


Pruning Kiwi Vine the First Year

  1. For the first year focus on straight growth and a strong framework. Tie the vine loosely to the post and keep it growing straight upward. Don’t allow it to twirl around the post. Remove all side branches until the vine reaches the top of the post.
  2. Cut out the top of the vine a few inches below the top of the post and encourage side shoots that grow laterally along the wires. Winter is the best time for pruning kiwi vine side branches along the wires. Cut them back to a point where the stems are about 1/4-inch in diameter. If the vine didn’t form good side branches at the top, cut the main trunk back by about 2 feet and try again next year.
  3. After the first year, focus on building strong lateral growth along the wires. Lead the branches near the top of the vine to the wires and fasten them in place every 18 to 24 inches. Cut the vine to keep it from extending beyond the wires. Remove shoots that are twisting around other shoots or taking off in the wrong direction.

Kiwi Pruning


How to Prune an Overgrown Kiwi

  1. Remove all of the branches that wind around the kiwi trellis. Also, remove vine sections wound around other branches or nearby plants. Using sharp, sterilized pruners make a clean cut about one inch (2.5 cm.) from the main vine.
  2. The next step is to trim out cross branches. This includes branches growing over or crossing other branches. Also, trim out shoots growing straight out from the stem since these will not bear fruit.
  3. Select a principal stem for the kiwi vine and train this straight up a trellis. It should get some 6 feet long. Just beyond this point, allow two lateral side shoots to grow over the trellis. Prune these back to three buds, then remove all other lateral shoots.

Read more at Gardening Know How: https://www.gardeningknowhow.com/edible/fruits/kiwi/pruning-kiwi-vines.htm
https://extension.psu.edu/hardy-kiwi-in-the-home-fruit-planting

Filed Under: Gardening for Guilty Pleasure, Planning and Design, Pruning and Other Practices

Three Invasive Species to Avoid When Planning your Garden

July 29, 2022

Purple Loosestrife

Scientific Name: Lythrum salicaria L.

Common Name: Purple Loosestrife

Family: Lythraceae (Loosestrife)

Type of Plant: Herbaceous Perennial

Usage: Ornamental

Identifying Characteristics:

Stems & roots: Stout plant, erect (24-48in); 4 angled stem can be smooth to fuzzy; long, well-established tap root

Leaves: Smooth, opposite (2 per node) or whorled (3 per node); narrow to narrowly oblong and heart shaped at base; 1.25-4 in long, attach directly to stems; upper leaves & those in the inflorescence alternate (1/node) & smaller than lower leaves

Flowers: Magenta – pink, tightly clustered, dense, terminal spikes from 4-20in; sepals united into a column with 8-12 prominent green veins & ending in several, long, thin, pointed lobes; 5-7 petals approx. 1/4in long; several stamens & 1 pistil; small seedpod. Bloom late June – mid Sept. Many garden species previously thought to be sterile can produce seeds by cross pollination with wild & other species, increasing the opportunities for spreading

Habitat: In the wild – wetlands, sedge meadows, open bogs. Can also occur along streams, riverbanks, lake shores. Opportunistic in areas with recent soil disturbance. Grows best in highly organic soils in full sun

Invasive Potential: Introduced from Europe. 2.7 million seeds per plant annually, highly invasive in wetland areas through wind, birds, animals & humans. Readily establishes itself, crowding out native species. Decrease in biodiversity has far reaching ecological implications including displacing plants & animals, eliminating food & shelter for wildlife, degrading native wetlands, reducing habitat for waterfowl. Native to Eurasia

Control: No effective method except in small, localized growth area where it can be intensively managed. Isolated areas, uproot plant by hand ensuring the removal of all parts of plant including all roots

Other methods of control: cutting, burning where permitted, herbicide application although herbicides can destroy other nearby plants

Biological control using root weevil (Hylobius transversovittatus), 2 specie

s leaf eating beetles (Galerucella pusilla & Galerucella calmariensis) have been approved by Canadian government. Research indicate there is little chance of permanent host transfer as these insects only feast on purple loosestrife

Recommendations: Recommended to dig all cultivars of Purple Loosestrife from the landscape and, according to the Manitoba Purple Loosestrife Project, can best be replaced with Spiked Gayfeather (Liatrus); a native plant with pink, purple or white flowers that is an environmentally safe perennial. It requires full sun to part shade, height up to 1.5-2.5m, hardy to CDA zone 3; blooms midsummer to Sept


Tartarian Honeysuckle

Scientific Name: Lonicera tatarica

Common Name: Tartarian Honeysuckle

Family: Caprifolaceae (Honeysuckle)

Type of Plant: Flowering Deciduous Shrub

Usage: Ornamental

Stems & roots: Woody, multi-stemmed, upright 2-5m; Branches thin, smooth, becoming hollow; Dicotyledon; bark turns pale grey & shreds with age

Leaves: Opposite, ovate, 3-6cm long, short-stalked & blue-green; Smooth, hairless, bluish-green leaves

Flowers: Usually in 2 pairs developing in axils of leaves at end of branches; 2 leaflets beneath each bud pair, 2 sepals above leaflets; Petals pink to crimson, tubular, 2-lipped, 7-20mm long, fragrant. Blooms May-June. Fruit – abundant berries 3mm diameter, joined at base, ripening orange to red that are available in winter for the birds & other wildlife

Habitat: Adaptable to wide range of habitat; open woods, ravines, woodland edges; prefer moist, sunny areas

Invasive Potential: Moderately invasive in Ontario. Replaces native understory species & ground flora thereby changing vegetation structure; impedes forest seedling & natural tree regeneration; spread by birds & mammals dispersing seed. Native Eastern Asia

Control:
Mechanical: less dense infiltrations – pull ensuring all roots removed
Chemical: systemic herbicides such as Roundup are most effective. Another method is to cut off near ground level & apply herbicide
Biological: There are no current biological control methods available
Recommendations: As with most invasive plants it is best to remove and replace. To contain remove seedlings annually as they appear. Widespread dispersion by birds limits effectiveness. Replacement with North American natives such as Spice bush (Lindera benzoin) – hardy to CDA zone 5 or Viburnum – hardy to CDA zone 3


Glossy Buckthorn

Scientific Name: Rhamnus frangula L.

Common Name: Glossy Buckthorn

Family: RHAMNACEAE (Buckthorn)

Type of Plant: RBC site consider this plant a deciduous tree but many sites consider it a flowering deciduous shrub

Usage: Ornamental

Identifying Characteristics:
Stems & roots: Most often grow in large shrub habit with a few to several stems shooting up from base; shrubs spreading, loosely branched crowns; Bark grey – brown with prominent, lighter-coloured lenticels (pores in the stem of a woody plant allowing exchange of gases between the plant and the exterior)*. Unusual winter appearance with naked, hairy terminal buds & appealing curved twigs with closely-spaced, prominent leaf scars giving the twigs a bumpy outline against a white snowy backdrop. Tree habit reaches 6-9m high and 26cm diameter

Leaves: Thin, glossy, ovate or elliptic leaves, 3.8-7.6cm long; upper leaf surface shiny; lower surface hairy or smooth with margins that are not toothed – a distinguishing feature from the similar common buckthorn

Flowers: Yellow-green, 4 petals develop in clusters of 2-6 near base of petioles. Plant are dioecious (male & female sex organs on separate plants). Fruits small, black berries 0.6cm in diameter appear singly or in small groups in leaf axils. Fruit is poisonous except to European Starling – primary agent responsible for the spread

Habitat: Prefers range of wetland areas such as marshes and bogs but can grow in upland habitats such as forest, wood edges & old fields. In Ontario, primarily near larger populations

Invasive Potential: Invasive locally in Southern & Eastern Ontario. Rapid spread & ability to invade native wetland areas suggest this will become a serious threat in the future. Detrimental effects include: outcompeting native plants for nutrients, light & moisture; degrading wildlife habitat, serving as host to pests such as crown rust fungus

Control:
Mechanical: Remove isolated plants early before seed production, prescribed burns if permitted by law (may need to do this for several years);
Chemical Control: Best during fall season to lessen risk of affecting non-target plants;
Biological Control: No current biological control methods
Recommendations: As with most invasive plants it is best to remove and replace. As with the Glossy Buckthorn, replacement with same North American natives such as Spice bush (Lindera benzoin) – hardy to CDA zone 5 or Viburnum – hardy to CDA zone 3 is recommended


Resources:
* Life Sciences & Allied Applications / Botany definition
Invasive Plants of the US: Plant Conservation Alliance’s Alien Plant Working Group: Environment of Canada: Royal Botanical Gardens: Ontario Food & Agriculture: Ministry of Agriculture, Food & Rural Affairs: Ontario Federation of Anglers & Hunters: Invading Species: Ducks Unlimited; Talk About Wildlife; Alberta:

Filed Under: Garden with Nature, Gardening for Guilty Pleasure, Invasives, Native Plants, Planning and Design, Pruning and Other Practices

Blue Flag Iris

January 25, 2022

Blue Flag Iris (Native Ontario Wildflower)
Other Common Names: American Blue Flag, Dagger Flower, Flag Lily, Larger Blue Flag, Multi-coloured Blue Flag, Poison Flag, Snake Lily, Water Flag
French Names: Iris versicolore
Habitat: Marshes, shallow water, preferring sun to part shade and wet feet
Flowers: Its deep blue flowers bloom in July atop stems that reach 60-90 cm.

  • Perennial that spreads by fleshy rhizomes
  • Ripe seed pod will split open and release seeds
  • Muskrats will not eat the rhizomes

Irises make an attractive display in shallow water
All parts of the plant are toxic

Blue Flag Iris

Filed Under: Garden with Nature, Gardening for Guilty Pleasure, Native Plants, Native Plants & Native Shorelines, Perennials

Container Gardening

December 15, 2021

Container Garden – Patio Planter

Even the smallest of spaces can enjoy the beauty of flowers or vegetables in well arranged containers. Container gardening is about more than just filling a pot with a few plants. It is about art in your garden, on your deck, on your balcony. It is about understanding and using plant knowledge and applying design concepts to create an attractive, sophisticated garden in a container. By considering composition using colour, form, and texture – containers can provide season long interest to any patio, deck and balcony or even those hard to fill spaces in the garden.

The Container

Choosing the container is as important as choosing the plants. I have selected an English style terra-cotta planter that is 24” wide at the top and narrows to 18” at the base. The container is 18” deep. The pot has five holes in the bottom to promote drainage. The choice of this pot means that more care will be required to maintain the health of the plants. Clay dries out more quickly as water evaporates more easily than from plastic or fiberglass containers and require more work to store during the winter months. However, I felt the beauty of the pot over-rides the above concerns.

The Media

The media I have chosen is Miracle-Gro potting mix with a enough available nutrients to get the plants started. I have used this media in the past with great success. The choice of a potting mix verses garden soil was made for a number of reasons. Soil does not drain well in containers. This leaves the potential of roots becoming soggy, reducing the oxygen availability to the roots and the decline in the health of the plant. Potting mixes are sterilized to kill weeds seeds and pathogens, are generally pH balanced and have a small amount of nutrients available to young plants.

I have chosen to cover the drainage holes with pot shards. The use of gravel, which we often learned from our mothers was the appropriate thing to do, raises the water table of the pot, leading again to the problem of soggy roots and soil borne diseases. By choosing to cover the holes in this way, the water table of the pot is equal to the bottom of the pot. If desired, one could cover the holes with polystyrene packing peanuts enclosed in clean, onion netting. This serves the dual purpose of containing the soil in the pot and lightening this heavy terra-cotta planter.

To mitigate dryness due to evaporation from the clay pot, water-absorbing polymers were added to the soil mix. When wet, these polymers hold up to 200 times their weight in water. As the growing medium dries out, the polymers release the water for plant use. This will help reduce the watering needs of the container, however it is important to check the planters daily for watering and disease or insect infestation.

Another amendment to the media is slow release fertilizer in the ratio of 1:2:2. Once the media is moist and the fertilizer has absorbed some water, soil temperature is the only factor that affects the long term release of the nutrients. The label on the fertilizer should inform the gardener of the ideal release temperature. Temperatures above the ideal will release the fertilizer more quickly and temperatures below the ideal will release the fertilizer more slowly than what is documented on the label. Apply the fertilizer to the media at the recommended rate for the size of the pot. Using a water-soluble fertilizer after the first three or four months may be needed to keep containers healthy and beautiful.

Water is added to the potting mix to moisten the soil after the water-absorbing polymers and slow release fertilizer are added and before planting. Potting mix can be quite dry coming out of the bag. Water is added and mixed in to the media and let sit for one or two hours for full absorption.

The Design

For the design, plants enjoying similar growing conditions are selected based on colour, shape and texture. In terms of colour, analogous colours of yellow and orange that are next to each other on the colour wheel (see image right) are chosen with a splash of contrast to add some drama. Colours include the harmonious hues of yellow rudbeckia and margarita daisy that with the orange canna flowers contrast with the dark purple leaves of sweet potato vine and the burgundy canna lily leaves. The ornamental grass with its finely textured green leaves and soft tan-coloured plumes adds texture to the appearance.

In addition to the design principals outlined above, another key component to designing planters are what have become to be known as thrillers, fillers and spillers. The thriller is the focal point of the container that draws the eye and adds height. Fillers make up the mid container space without distracting from the focal point. Spillers are cascading plants that flow over the edge of the container and fill the spaces left after planting the fillers. Plants with different or long blooming periods or that display distinctive foliage, some of which may change colour with the onset of fall, provides interest over the season.

After filling the container to about two thirds full with media, arrange the plants as per the design. The largest plant – the Canna – will be planted first, followed by the grass and then the filler and spiller plants using the remaining media. Fill the container with the pre-moistened media to approximately 2.5 cm below the edge of the pot for water catchment. As with the garden, plants should be planted no deeper than they are in the original pot.

The plants include the following list with the Canna planted at the far edge of the container and the fountain grass beside it. The Marguerite daisies are planted next is a semi circle around the specimen plants followed by the geraniums between and in front of the daisies. The sweet potato vine is planted last and position such that it spills over the edge.

A: Canna ‘Tropicanna’ (Tropicanna Canna) – 1 plant

B: Pennisetum alopecuriodes ‘Hameln’ (Dwarf Fountain Grass) – 1 plant

C: Argyranthemum frutescens ‘Butterfly’ (Marguerite Daisy) – 3 plants

D: Pelargonium ‘Blood Red’ (Blood Red Geranium) – 3 plants

E: Ipomoea batalas ‘Blackie’ (Sweet Potato Vine) – 3 plants

The Thrillers

It is important to consider the perspective or angle of view when planting the container. In this instance the thrillers are placed close to the back of the planter and slightly off centre as the angle of view is about 280 degrees.

Pennisetum alopecuriodes ‘Hameln’ (Dwarf Fountain Grass) has been selected as the focal point (image right). This specimen is considered an annual in Haliburton although it is hardy to CDA zone 5 and some sites indicate it is cold hardy to zone 4. It is a fine textured arching grass with green leaves and mid-summer tan-coloured blooms. In full sun and moist, well-drained soil it will grow to about 80-90 cm (32-36”) tall.

Canna ‘Tropicanna’ (Tropicanna Canna Lily) will add height to the arrangement (see image right). Chosen for its broad leaves with green, burgundy, red and yellow stripes and brilliant orange flowers, this eye-catching specimen stands about 120 cm (48”) tall. As with most Cannas, this specimen prefers full sun and rich, moist soils, especially during the active growing period. For best flower development a higher potassium fertilizer in the ratio similar to the 1:2:2 added as an amendment is preferable. The rhizomes are tender and will be started indoors at the beginning of April and transplanted to the container.

The Fillers

The filler plants include three Marguerite Daisies and three red Geraniums.

Argyranthemum frutescens ‘Butterfly’ (Marguerite Daisy ‘Butterfly). A tender perennial in zone 9, this specimen is considered an annual in Ontario. Growing to a height of 40-60 cm (16-26”), this gorgeous flower blooms late spring through to frost providing colour season over the entire season. The bright green, deeply lobed fern-like leaves are fragrant when crushed and will add a fine texture and contrast to the container. The flowers are bright yellow with golden-orange centres and complement both the geranium and canna.

Pelargonium ‘Blood Red’. An annual commonly known as geranium are used as bedding plants in Ontario. Growing to a height of about 30-50 cm (12-16”) tall, these plants prefer full sun and rich well-drained soil. Deadheading will promote blooming over the entire summer, adding rich colour to the container.

The Spillers

Ipomoea batatas ‘Blackie’ (Sweet Potato Vine ‘Blackie’) (image right). Chosen primarily for its foliage, this plant has stunning purple leaves that spill over the edges of the container trailing up to 150 cm. It will add interest and contrast to the yellow flowers and green leaves of the filler plants. Like the other container plants, sweet potato vine does well in full to part sun and moist, well drained soil.

Maintenance

This container will need to be checked daily for watering needs although the water-absorbing polymers will keep the plants moist for a period of time. Morning watering is best so that plant leaves have an opportunity to dry during the day thereby helping to avoid any disease problems. Even in seasons with high rainfalls, containers still need to be watered as rarely is enough rain absorbed to meet the plants needs. Water when the soil feels dry for a depth of 2.5 cm and if possible, try to avoid wetting the leaves.

Because a slow release fertilizer was mixed into the media, additional fertilizer may not be required. However with the hot summer temperatures in Ontario, the release of nutrients may be faster than anticipated. My preference is to add a water-soluble fertilizer every four weeks during periods of rapid growth and bloom period. Fertilizer applications will be reduced in the fall to ensure the perennials harden-off for the winter.

Deadheading of spent flowers will encourage continuous blooms throughout the summer and keep the arrangement looking tidy. Any damaged or diseased stems will need to be pruned out and some shaping may be required. While deadheading, plants can be inspected for bugs and disease.

Slugs, snails and earwigs can be picked off or treated with a pesticide. Pelletized products work well in containers but may have to be replaced once every six weeks or so as they are water-soluble. Aphids are another common problem in container plantings and can be sprayed off with water if the infestation is mild. The use of an insecticidal soap on the undersides of leaves and on stems is also helpful.

Some of the plants in this container can be overwintered. The arrangement will be disassembled in early October so that the perennials will have an opportunity to establish themselves in the landscape before winter sets in.

The Dwarf Fountain Grass will be planted in a sheltered area of the garden to see if it will overwinter in zone four. The annuals will be discarded into the compost bin.

The Canna rhizome will require a little more care. The plant will be cut back to within 3 cm of the bulb after the first killing frost. The rhizome will be lifted, and leaving some soil around the clump, stored in a cool dry area in the basement. The rhizomes like to be moist, even when dormant. Inspect periodically and sprinkle with water if needed. Rhizomes can be divided in the spring wherever there is more than one stem.

The terra-cotta container needs to washed and dried and stored in the basement as it can freeze and crack in the cold winter weather. Prior to planting in the spring, the pot should be washed again with soap and water, rinsed and sterilized using a 10% bleach solution.

Resources

Bluestem Nursery

Canadian Gardening Magazine

Far East Plants Corporation

Heritage Perennials

Paul Zammit: The Greenhouse Grower

Plant Advice

Proven Winners

Filed Under: Fruits, Gardening for Guilty Pleasure, Growing Food, Herbs, Native Plants, Perennials, Soil

Erosion Solutions From Heavy Rain

October 25, 2021

Question: Can you slow water runoff at the top of a slope?

Natural Stone Steps
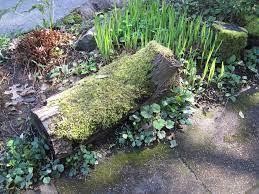
Master Gardener Carolyn Langdon advises you to build a small rain garden at the top of your slope. Add a small berm at the top of and/or mid-way down your slope. Put in a berm of logs, branches, soil and/or rocks to slow down the water running off and to allow time for the rain to absorb and for plant roots to establish. The idea is to place any material that will act to obstruct or slow down the path of water. Organic material has the additional benefit of providing texture and nutrients to your soil as it breaks down.

Clearing a shoreline or hillside of herbaceous plants, shrubs and trees can lead to erosion if not re-planted. Longer, steeper slopes, especially those without adequate vegetative cover are more susceptible to very high rates of erosion during heavy rains than shorter, less steep slopes.

Please remember that a rain garden is not the same as a water garden. There are 5 components to a rain garden:

1. Depression
2. Amended filter bed (see wood log trench below)
3. Berm on the low side
4. Rockery to slow water entering the garden if necessary
5. Plants tolerant of water and long periods of dryness (i.e. 2-3 days of standing water)

Woodlog Trench DiagramNatural Wood Log Berm


A rain garden is a low tech solution for a location that periodically gets inundated with water. For example some downspouts can’t handle the quantity of rain and the spill over can cause existing vegetation to die and erosion of soil. Hard surfaces channel water during torrential rain and spring snow melt events that cause erosion particularly on steep slopes. A rain garden and berming might be an affordable solution. A 5X10 foot rain garden 6 inches deep is equivalent to 11 rain barrels.

Dig your rain garden (12-18” deep) and fill with a combination of logs, branches, and wood chips at different stages of decomposition. Add native soil and locally composted organic matter. Plant. Remember good humic soil will store a lot of water. Other practises for extreme sites is to mulch deeply, contour the soil, plant native species adapted to the location and plant densely.

Select the Right Plants

In this situation plants that can withstand short periods of flooding and long periods of dryness are required. Xerioscaping plants i.e. those that tolerate drought won’t do well in a condition that includes extreme wet and extreme dry. Likewise plants that require constant moisture wil not do well.

Do favour native over non-native plants and do not plant fast growing invasive plants however tempting that might be to stabilize your slope.

The following native Ontario plants can tolerate moist and dry soil:

Aster (Aster spp.)
Bergamot, Wild (Monarda fistulosa)
Black-Eyed Susans (Rudbeckia hirta)
Blazing stars, Rough (Liatris aspera)
Evening Primrose (Oenothera biennis)
Bittersweet (Celastrus scandens)
Goldenrod (Solidago spp.)
Verbena (Verbena spp.)
Yarrow (Achillea millefolium)
Sweet gale or bog myrtle (Myrica gale L) Myricaceae (Wax-myrtle or bayberry Family)
Non invasive ornamental grasses, native sedges (they look like grasses and can tolerate some shade), and rushes. Hierochloe odorata or Sweetgrass
Marginal Woodfern (Dryopteris marginalis) can tolerates mid-summer drought if planted in the shade.
Butterfly Weed (Asclepias tuberosa) a Zone 3 Ontario Native that is heat and drought tolerant,
Liatris aspera or Blazing Star, another Ontario native,
Schizachyrium scoparium or Little Bluestem (Ontario native)
Highbush Cranberry (V. trilobum or V. opulus var. americanum). This native shrub likes to grow in open, wooded, somewhat poorly drained locations. In the ideal location, cranberry can become very wide, often three metres or more, and reach about the same height.
Low bush Cranberry or Squashberry (V. edule)
Nannyberry (Viburnum lentago) will grow almost anywhere including shade, but they take on their best form in full sunlight. In full sun their fall leaf colours will be a vibrant purple-red.
Common or Eastern Ninebark up to 3 m, spring flower cluster, berries

Credit Valley Conservation planted native plants in their rain garden. They chose the following plants because they were widely available at local nurseries: Red Osier Dogwood, New England Aster, Tall Meadow Rue, Black Eyed Susans, Canada Anemone.  Shade-tolerant native plants included: Common elderberry, Sensitive Fern and Heart leaved Aster.

A dense base of day lilies and irises will give you a fibrous root system. While they aren’t native they are often planted in a naturalized landscape.

To buy plants please try your local garden centre and check other sources listed in our list of suppliers and services here.


Article Sources

Credit Valley

Toronto Zoo

For additional plant selection please see Appendix C, List of Plants tolerating both wet and dry conditions. University of Guelph

Filed Under: Garden with Nature, Gardening for Guilty Pleasure, Native Plants & Native Shorelines, Planning and Design, Tips

  • Page 1
  • Page 2
  • Go to Next Page »

coordinator@haliburtonmastergardener.ca

privacy policy

Haliburton County Development Corporation logo


HCMG logo
Member Login
  • Ask a Question
  • Resources
  • About
  • News & Events

Follow us on YouTube badge

  • Newsletter Signup
  • Contact
  • Buy Local

© 2025 HaliburtonMasterGardener.ca   •   Website Development by TechnicalitiesPlus Inc.