• Skip to primary navigation
  • Skip to main content

Haliburton County Master Gardeners

Gardening in Haliburton County

sign up
site search
  • Ask a Question
    • MG Questions Answered
  • Request a Consult
  • Resources
    • Garden with Nature
      • For Your Property Including Shorelines
      • Go Wild
      • Invasives
      • Native Plants & Native Shorelines
      • Sunny Sites
      • Trees
      • Woodland
    • Gardening for Guilty Pleasure
      • Perennials
      • Planning and Design
    • Growing Food
      • Fruits
      • Herbs
      • Native Edibles
      • Pruning and Other Practices
      • Vegetables
      • Soil
    • Native Plants
      • Selection of Native Plants for the Highlands
    • Zone 4 Challenges
      • Pests
      • Tips
      • Wildlife
    • Useful Links
      • Canoe Radio Podcasts
      • County Life Magazine
      • MGOI Website
      • Videos
  • Guidebook
  • About
    • How to Become a Master Gardener
  • What’s On
    • Events Calendar
    • Butterflyway Project
    • Stepping into Nature
  • Buy Local
  • Contact
  • Facebook logo
  • YouTube logo
  • Printer icon graphic

Perennials

PLANTING GARLIC ‘Here in the Haliburton Highlands’*

January 20, 2023

Keep it simple…follow some basic steps…let them sleep…greet them in the spring!

Plant between Thanksgiving and mid-November here in the Highlands

Our growing season is not long and therefore by planting in the fall, roots are given a chance to develop before the cloves go to sleep in the freezing soil. As the soil warms in the spring, the clove, still cold, is stimulated to sprout and develop into a bulb. Since the roots have already started in the previous fall, the cloves get a head start on the new growing season.

Site

  • A sunny location (8 to 10 hrs)
  • Loose crumbly soil so the roots can penetrate deep for the nutrients and water.

Soil prep

  • Work year old manure or compost into the top 4 to 5 inches of the planting bed.
  • Raised beds are preferable, 3 to 4’ wide for easy access from either side of the bed.
  • Length of the bed will depend on your space and how much you wish to harvest.

Planting

  • Source fresh, local garlic for planting. It will be primed to Haliburton’s growing conditions.
  • Separate the cloves from the stem, protecting the root base, so each clove has a root base for new growth.

TIPS UP! Always!

  • Plant in holes or trench prepared 4” deep – 6” apart
  • Cover and tamp down gently to bring soil into contact with cloves.
  • After a good frost and before the ground freezes, it is recommended to apply a mulch of 6” to the planted garlic bed. Spoiled hay, straw or chopped up leaves can be used to cover and protect the cloves from heaving and cold weather damage.

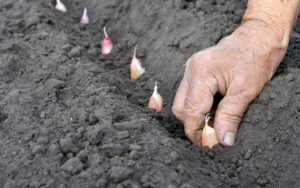
Breaking apart Garlic Bulb for planting

Planting Garlic

Pruning and Maintenance of Gooseberry Bushes*

January 20, 2023

General Care:

  • Mulch to conserve moisture and reduce weeds.
  • Water 1 inch per week from spring until after harvest.
  • Every 3-4 years fertilize in early spring with a balanced fertilizer (10-10-10).
  • Can be grown in containers, trained up a trellis, pruned into small trees or maintained as a small shrub.

NOTE: Very sharp thorns. Wear gloves when handling and picking berries.

Pests & Diseases:

  • Susceptible to powdery mildew and fungus.

Winter/Early Spring Pruning Steps (bush still dormant):

  1. Remove dead and diseased wood.
  2. Remove tangled, crossed, overcrowded or branches touching the ground.

Branches that are left, make the following cuts just above an outward facing bud:

  1. Cut back the previous seasons grown by half.
  2. Cut back side branches between 1 and 3 buds from the base of the shoot.
  3. Remove any suckers growing away from the main stem.

NOTE: For established plants, remove canes over 4 years old. Ideal bush has about a dozen canes at any one time, half being new shoots and other half a mix of 2- and 3-year-old canes.

Summer Pruning (mid-June):

  • Pruning of new growth will improve air circulation. Shorten new growth tips to 5 leaves.


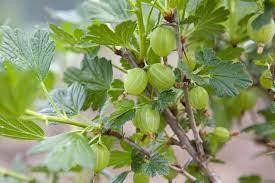
Gooseberry Bush


How to Prune a Gooseberry Bush


Pruning and Maintenance of Raspberry Canes*

January 20, 2023

General Care:

  • Mulch to conserve moisture and reduce weeds.
  • Water 1 inch per week from spring until after harvest.
  • Keep bushes tidy by removing “suckers” that grow outside of designated rows. This prevents loss of nutrients used to grow the canes which will reduce berry size of next years crop.

Pests & Diseases:

  • June through August watch for spider mites and Japanese beetles. Also susceptible to cane borers and powdery mildew.
  • Rabbits will eat canes in the winter. Prevent with chicken wire fence.

Ever-bearing Raspberries AKA Fall-bearing Raspberries

  • Fruit on first year of growth.
  • After fruiting in fall, cut all canes to the ground. No pruning is required during the growing season.
  • Clean up all debris to avoid disease and pests over winter.
  • NOTE: To harvest both a fall and following summer crop, do not remove the primocanes that produced the fall crop. Prune them back in spring to 12 inches to the last visible node that had fruit and cut off dead tips.

Summer Fruiting Raspberries

  • Produces fruit on 2-year-old canes.
  • In the fall, cut canes to the ground that produced berries. These older canes are brown. Do not cut the new green canes as they will fruit next year.

4 Easy steps to Pruning Red Raspberries:

  1. Remove last year’s floricanes
  2. Narrow the row width to 1.5 – 2 feet
  3. Cut out the weaklings. You only want the tallest, thickest and healthiest looking canes left.
  4. Attach remaining canes to a V-shaped trellis. This design has 2 parallel wires spaced 3 feet apart and approximately 4 feet high. Attach canes to the trellis using twine. Tie canes so half are on one side of the row and half on the other side, approximately 1 every 4 inches. This promotes air circulation and encourages new growth in the center for next year. In addition, fruit will be on the outside for easier picking.

Raspberry Cane Pruning


Raspberry Canes Before and After Pruning


Pruning and Maintenance of Rose Bushes*

January 20, 2023

General Care:

  • Mulch to conserve moisture and reduce weeds.
  • Water 1 inch per week from spring until after harvest.
  • Roses are heavy feeders.
  • Spring: Fertilize with a slow release, balanced fertilizer.
  • Throughout season: Feed every 4 weeks.
  • Late summer, early fall: Stop fertilizing 6 – 8 weeks before frost date in preparation for winter.
  • NOTE: Very sharp thorns. Wear gloves when handling.

Pests & Diseases:

  • Susceptible to rose borers, powdery mildew, and fungus.

Late Winter/Early Spring Pruning Steps (start of new growth):

  • Remove all remaining leaves.
  • Prune dead wood back to the base.
  • Prune out crossing branches. Ideally create an open vase-like shape to increase air circulation.
  • Remove thin and weak growth (anything thinner than a pencil).
  • Shape the remaining canes into desired shape by cutting ¼” – ½” above an outward facing bud, at an angle sloping away from the bud.
  • Dispose of any leaves and waste to prevent spread of disease.

Fall Pruning (after killing frost):

  • Prune only as needed for winter preparation.
  • Trim longer stems to keep from snapping in winter storms.
  • Trim crossed branches to prevent rubbing.
  • Remove dead/diseased branches and foliage. 


Rose Bush Pruning Diagram


coordinator@haliburtonmastergardener.ca

privacy policy

Haliburton County Development Corporation logo


HCMG logo
Member Login
  • Ask a Question
  • Resources
  • About
  • News & Events

Follow us on YouTube badge

  • Newsletter Signup
  • Contact
  • Buy Local

© 2025 HaliburtonMasterGardener.ca   •   Website Development by TechnicalitiesPlus Inc.