 The Haliburton Land Trust has singled out the Haliburton County Master Gardeners through its Enviro-Hero award for its hard work bringing environmental concerns to the County. HCMG is being recognized for its stewardship and education work particularly in helping property owners understand the unique growing conditions of the highlands and the benefits of adding more native plants. HCMG has fielded dozens of questions through its “Ask a Master Gardener” program. As well teams of master gardeners visited over 20 sites in 2021, with many property owners requesting advice on solving design and site issues with native plants, shrubs and trees over hard scape solutions.

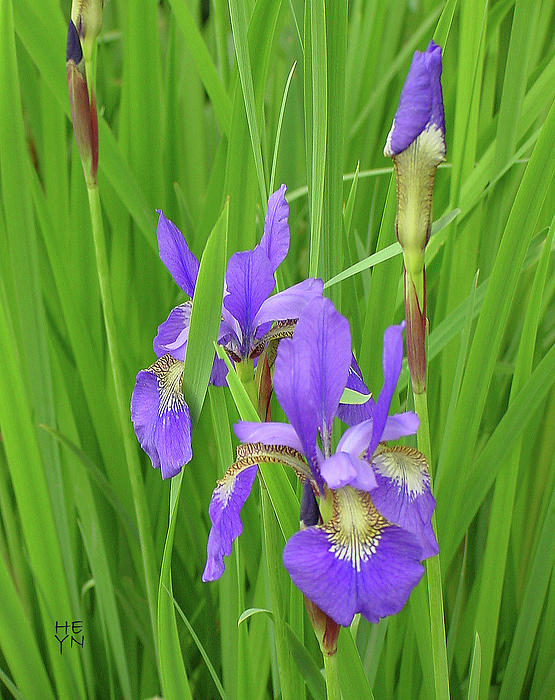
Blue Flag Iris (Native Ontario Wildflower)
Other Common Names: American Blue Flag, Dagger Flower, Flag Lily, Larger Blue Flag, Multi-coloured Blue Flag, Poison Flag, Snake Lily, Water Flag
French Names: Iris versicolore
Habitat: Marshes, shallow water, preferring sun to part shade and wet feet
Flowers: Its deep blue flowers bloom in July atop stems that reach 60-90 cm.
- Perennial that spreads by fleshy rhizomes
- Ripe seed pod will split open and release seeds
- Muskrats will not eat the rhizomes
Irises make an attractive display in shallow water
All parts of the plant are toxic

Container Garden – Patio Planter
Even the smallest of spaces can enjoy the beauty of flowers or vegetables in well arranged containers. Container gardening is about more than just filling a pot with a few plants. It is about art in your garden, on your deck, on your balcony. It is about understanding and using plant knowledge and applying design concepts to create an attractive, sophisticated garden in a container. By considering composition using colour, form, and texture – containers can provide season long interest to any patio, deck and balcony or even those hard to fill spaces in the garden.
The Container
Choosing the container is as important as choosing the plants. I have selected an English style terra-cotta planter that is 24” wide at the top and narrows to 18” at the base. The container is 18” deep. The pot has five holes in the bottom to promote drainage. The choice of this pot means that more care will be required to maintain the health of the plants. Clay dries out more quickly as water evaporates more easily than from plastic or fiberglass containers and require more work to store during the winter months. However, I felt the beauty of the pot over-rides the above concerns.
The Media
The media I have chosen is Miracle-Gro potting mix with a enough available nutrients to get the plants started. I have used this media in the past with great success. The choice of a potting mix verses garden soil was made for a number of reasons. Soil does not drain well in containers. This leaves the potential of roots becoming soggy, reducing the oxygen availability to the roots and the decline in the health of the plant. Potting mixes are sterilized to kill weeds seeds and pathogens, are generally pH balanced and have a small amount of nutrients available to young plants.
I have chosen to cover the drainage holes with pot shards. The use of gravel, which we often learned from our mothers was the appropriate thing to do, raises the water table of the pot, leading again to the problem of soggy roots and soil borne diseases. By choosing to cover the holes in this way, the water table of the pot is equal to the bottom of the pot. If desired, one could cover the holes with polystyrene packing peanuts enclosed in clean, onion netting. This serves the dual purpose of containing the soil in the pot and lightening this heavy terra-cotta planter.
To mitigate dryness due to evaporation from the clay pot, water-absorbing polymers were added to the soil mix. When wet, these polymers hold up to 200 times their weight in water. As the growing medium dries out, the polymers release the water for plant use. This will help reduce the watering needs of the container, however it is important to check the planters daily for watering and disease or insect infestation.
Another amendment to the media is slow release fertilizer in the ratio of 1:2:2. Once the media is moist and the fertilizer has absorbed some water, soil temperature is the only factor that affects the long term release of the nutrients. The label on the fertilizer should inform the gardener of the ideal release temperature. Temperatures above the ideal will release the fertilizer more quickly and temperatures below the ideal will release the fertilizer more slowly than what is documented on the label. Apply the fertilizer to the media at the recommended rate for the size of the pot. Using a water-soluble fertilizer after the first three or four months may be needed to keep containers healthy and beautiful.
Water is added to the potting mix to moisten the soil after the water-absorbing polymers and slow release fertilizer are added and before planting. Potting mix can be quite dry coming out of the bag. Water is added and mixed in to the media and let sit for one or two hours for full absorption.
The Design
For the design, plants enjoying similar growing conditions are selected based on colour, shape and texture. In terms of colour, analogous colours of yellow and orange that are next to each other on the colour wheel (see image right) are chosen with a splash of contrast to add some drama. Colours include the harmonious hues of yellow rudbeckia and margarita daisy that with the orange canna flowers contrast with the dark purple leaves of sweet potato vine and the burgundy canna lily leaves. The ornamental grass with its finely textured green leaves and soft tan-coloured plumes adds texture to the appearance.
In addition to the design principals outlined above, another key component to designing planters are what have become to be known as thrillers, fillers and spillers. The thriller is the focal point of the container that draws the eye and adds height. Fillers make up the mid container space without distracting from the focal point. Spillers are cascading plants that flow over the edge of the container and fill the spaces left after planting the fillers. Plants with different or long blooming periods or that display distinctive foliage, some of which may change colour with the onset of fall, provides interest over the season.
After filling the container to about two thirds full with media, arrange the plants as per the design. The largest plant – the Canna – will be planted first, followed by the grass and then the filler and spiller plants using the remaining media. Fill the container with the pre-moistened media to approximately 2.5 cm below the edge of the pot for water catchment. As with the garden, plants should be planted no deeper than they are in the original pot.
The plants include the following list with the Canna planted at the far edge of the container and the fountain grass beside it. The Marguerite daisies are planted next is a semi circle around the specimen plants followed by the geraniums between and in front of the daisies. The sweet potato vine is planted last and position such that it spills over the edge.
A: Canna ‘Tropicanna’ (Tropicanna Canna) – 1 plant
B: Pennisetum alopecuriodes ‘Hameln’ (Dwarf Fountain Grass) – 1 plant
C: Argyranthemum frutescens ‘Butterfly’ (Marguerite Daisy) – 3 plants
D: Pelargonium ‘Blood Red’ (Blood Red Geranium) – 3 plants
E: Ipomoea batalas ‘Blackie’ (Sweet Potato Vine) – 3 plants
The Thrillers
It is important to consider the perspective or angle of view when planting the container. In this instance the thrillers are placed close to the back of the planter and slightly off centre as the angle of view is about 280 degrees.
Pennisetum alopecuriodes ‘Hameln’ (Dwarf Fountain Grass) has been selected as the focal point (image right). This specimen is considered an annual in Haliburton although it is hardy to CDA zone 5 and some sites indicate it is cold hardy to zone 4. It is a fine textured arching grass with green leaves and mid-summer tan-coloured blooms. In full sun and moist, well-drained soil it will grow to about 80-90 cm (32-36”) tall.
Canna ‘Tropicanna’ (Tropicanna Canna Lily) will add height to the arrangement (see image right). Chosen for its broad leaves with green, burgundy, red and yellow stripes and brilliant orange flowers, this eye-catching specimen stands about 120 cm (48”) tall. As with most Cannas, this specimen prefers full sun and rich, moist soils, especially during the active growing period. For best flower development a higher potassium fertilizer in the ratio similar to the 1:2:2 added as an amendment is preferable. The rhizomes are tender and will be started indoors at the beginning of April and transplanted to the container.
The Fillers
The filler plants include three Marguerite Daisies and three red Geraniums.
Argyranthemum frutescens ‘Butterfly’ (Marguerite Daisy ‘Butterfly). A tender perennial in zone 9, this specimen is considered an annual in Ontario. Growing to a height of 40-60 cm (16-26”), this gorgeous flower blooms late spring through to frost providing colour season over the entire season. The bright green, deeply lobed fern-like leaves are fragrant when crushed and will add a fine texture and contrast to the container. The flowers are bright yellow with golden-orange centres and complement both the geranium and canna.
Pelargonium ‘Blood Red’. An annual commonly known as geranium are used as bedding plants in Ontario. Growing to a height of about 30-50 cm (12-16”) tall, these plants prefer full sun and rich well-drained soil. Deadheading will promote blooming over the entire summer, adding rich colour to the container.
The Spillers
Ipomoea batatas ‘Blackie’ (Sweet Potato Vine ‘Blackie’) (image right). Chosen primarily for its foliage, this plant has stunning purple leaves that spill over the edges of the container trailing up to 150 cm. It will add interest and contrast to the yellow flowers and green leaves of the filler plants. Like the other container plants, sweet potato vine does well in full to part sun and moist, well drained soil.
Maintenance
This container will need to be checked daily for watering needs although the water-absorbing polymers will keep the plants moist for a period of time. Morning watering is best so that plant leaves have an opportunity to dry during the day thereby helping to avoid any disease problems. Even in seasons with high rainfalls, containers still need to be watered as rarely is enough rain absorbed to meet the plants needs. Water when the soil feels dry for a depth of 2.5 cm and if possible, try to avoid wetting the leaves.
Because a slow release fertilizer was mixed into the media, additional fertilizer may not be required. However with the hot summer temperatures in Ontario, the release of nutrients may be faster than anticipated. My preference is to add a water-soluble fertilizer every four weeks during periods of rapid growth and bloom period. Fertilizer applications will be reduced in the fall to ensure the perennials harden-off for the winter.
Deadheading of spent flowers will encourage continuous blooms throughout the summer and keep the arrangement looking tidy. Any damaged or diseased stems will need to be pruned out and some shaping may be required. While deadheading, plants can be inspected for bugs and disease.
Slugs, snails and earwigs can be picked off or treated with a pesticide. Pelletized products work well in containers but may have to be replaced once every six weeks or so as they are water-soluble. Aphids are another common problem in container plantings and can be sprayed off with water if the infestation is mild. The use of an insecticidal soap on the undersides of leaves and on stems is also helpful.
Some of the plants in this container can be overwintered. The arrangement will be disassembled in early October so that the perennials will have an opportunity to establish themselves in the landscape before winter sets in.
The Dwarf Fountain Grass will be planted in a sheltered area of the garden to see if it will overwinter in zone four. The annuals will be discarded into the compost bin.
The Canna rhizome will require a little more care. The plant will be cut back to within 3 cm of the bulb after the first killing frost. The rhizome will be lifted, and leaving some soil around the clump, stored in a cool dry area in the basement. The rhizomes like to be moist, even when dormant. Inspect periodically and sprinkle with water if needed. Rhizomes can be divided in the spring wherever there is more than one stem.
The terra-cotta container needs to washed and dried and stored in the basement as it can freeze and crack in the cold winter weather. Prior to planting in the spring, the pot should be washed again with soap and water, rinsed and sterilized using a 10% bleach solution.
Resources
Paul Zammit: The Greenhouse Grower
Question: Can you slow water runoff at the top of a slope?
 Haliburton County Master Gardener advises you to build a small rain garden at the top of your slope. Add a small berm at the top of and/or mid-way down your slope. Put in a berm of logs, branches, soil and/or rocks to slow down the water running off and to allow time for the rain to absorb and for plant roots to establish. The idea is to place any material that will act to obstruct or slow down the path of water. Organic material has the additional benefit of providing texture and nutrients to your soil as it breaks down.
Clearing a shoreline or hillside of herbaceous plants, shrubs and trees can lead to erosion if not re-planted. Longer, steeper slopes, especially those without adequate vegetative cover are more susceptible to very high rates of erosion during heavy rains than shorter, less steep slopes.
Please remember that a rain garden is not the same as a water garden. There are 5 components to a rain garden:
1. Depression
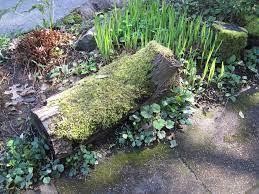
2. Amended filter bed (see wood log trench below)
3. Berm on the low side
4. Rockery to slow water entering the garden if necessary
5. Plants tolerant of water and long periods of dryness (i.e. 2-3 days of standing water)

A rain garden is a low tech solution for a location that periodically gets inundated with water. For example some downspouts can’t handle the quantity of rain and the spill over can cause existing vegetation to die and erosion of soil. Hard surfaces channel water during torrential rain and spring snow melt events that cause erosion particularly on steep slopes. A rain garden and berm might be an affordable solution. A 5X10 foot rain garden 6 inches deep is equivalent to 11 rain barrels.
Dig your rain garden (12-18” deep) and fill with a combination of logs, branches, and wood chips at different stages of decomposition. Add native soil and locally composted organic matter. Plant. Remember good humid soil will store a lot of water. Other practices for extreme sites is to mulch deeply, contour the soil, plant native species adapted to the location and plant densely.
Select the Right Plants
In this situation plants that can withstand short periods of flooding and long periods of dryness are required. Xeriscaping plants i.e. those that tolerate drought won’t do well in a condition that includes extreme wet and extreme dry. Likewise plants that require constant moisture will not do well.
Do favor native over non-native plants and do not plant fast growing invasive plants however tempting that might be to stabilize your slope.
The following native Ontario plants can tolerate moist and dry soil:
Aster (Aster spp.)
Bergamot, Wild (Monarda fistulosa)
Black-Eyed Susans (Rudbeckia hirta)
Blazing stars, Rough (Liatris aspera)
Evening Primrose (Oenothera biennis)
Bittersweet (Celastrus scandens)
Goldenrod (Solidago spp.)
Verbena (Verbena spp.)
Yarrow (Achillea millefolium)
Sweet gale or bog myrtle (Myrica gale L) Myricaceae (Wax-myrtle or bayberry Family)
Non invasive ornamental grasses, native sedges (they look like grasses and can tolerate some shade), and rushes. Hierochloe odorata or Sweetgrass
Marginal Woodfern (Dryopteris marginalis) can tolerates mid-summer drought if planted in the shade.
Butterfly Weed (Asclepias tuberosa) a Zone 3 Ontario Native that is heat and drought tolerant,
Liatris aspera or Blazing Star, another Ontario native,
Schizachyrium scoparium or Little Bluestem (Ontario native)
Highbush Cranberry (V. trilobum or V. opulus var. americanum). This native shrub likes to grow in open, wooded, somewhat poorly drained locations. In the ideal location, cranberry can become very wide, often three meters or more, and reach about the same height.
Low bush Cranberry or Squashberry (V. edule)
Nannyberry (Viburnum lentago) will grow almost anywhere including shade, but they take on their best form in full sunlight. In full sun their fall leaf colors will be a vibrant purple-red.
Common or Eastern Ninebark up to 3 m, spring flower cluster, berries
Credit Valley Conservation planted native plants in their rain garden. They chose the following plants because they were widely available at local nurseries: Red Osier Dogwood, New England Aster, Tall Meadow Rue, Black Eyed Susans, Canada Anemone. Shade-tolerant native plants included: Common elderberry, Sensitive Fern and Heart leaved Aster.
A dense base of day lilies and irises will give you a fibrous root system. While they aren’t native they are often planted in a naturalized landscape.
To buy plants please try your local garden center and check other sources listed in our list of suppliers and services here.
Article Sources
For additional plant selection please see Appendix C, List of Plants tolerating both wet and dry conditions. University of Guelph
Keep it simple…follow some basic steps…let them sleep…greet them in the spring!
Plant between Thanksgiving and mid-November here in the Highlands
Our growing season is not long and therefore by planting in the fall, roots are given a chance to develop before the cloves go to sleep in the freezing soil. As the soil warms in the spring, the clove, still cold, is stimulated to sprout and develop into a bulb. Since the roots have already started in the previous fall, the cloves get a head start on the new growing season.
Site
- A sunny location (8 to 10 hrs)
- Loose crumbly soil so the roots can penetrate deep for the nutrients and water.
Soil prep
- Work year old manure or compost into the top 4 to 5 inches of the planting bed.
- Raised beds are preferable, 3 to 4’ wide for easy access from either side of the bed.
- Length of the bed will depend on your space and how much you wish to harvest.
Planting
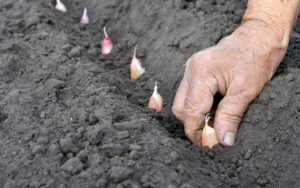
- Source fresh, local garlic for planting. It will be primed to Haliburton’s growing conditions.
- Separate the cloves from the stem, protecting the root base, so each clove has a root base for new growth.
TIPS UP! Always!
- Plant in holes or trench prepared 4” deep – 6” apart
- Cover and tamp down gently to bring soil into contact with cloves.
- After a good frost and before the ground freezes, it is recommended to apply a mulch of 6” to the planted garlic bed. Spoiled hay, straw or chopped up leaves can be used to cover and protect the cloves from heaving and cold weather damage.


In our gardens, many of us have space for, or may already grow an herb garden but feel more comfortable keeping these fragrant plants outside. These delicate plants can very easily be brought into your kitchen to enrich your cooking and your lives.
Growing and cooking with fresh herbs can be an extremely rewarding experience. Not only do you have beautiful fresh herbs throughout summer and fall but if harvested and dried properly you can have a bountiful supply of herbs throughout the winter and spring months until once again your new harvest comes in the following summer. Imagine walking out to your herb garden and snipping just the right amount needed for a recipe as opposed to going to the market being forced to buy a large overly-priced container of an herb such as oregano when all you need is one or two teaspoons. That in itself is worth the effort of growing your own herbs.
A good idea is to plant only those herbs that you will cook with or use to make herbal teas, vinegars and oils. An excellent selection of herbs to start with would be basil, chives, cilantro, dill weed, fennel, mint, oregano, parsley, rosemary, sage, sweet marjoram, tarragon, and lemon thyme. Many aromatic herbs such as mint, parsley, sage and rosemary tend to repel certain insects therefore making valuable garden companions for vulnerable plants. Dill, balm, and thyme are some of the herbs that attract bees which pollinate other plants. Therefore, keep in mind companion planting when deciding on where to plant each herb. But as delicate as these herbs are, aggressive growers such as mint and oregano should be contained in pots so they do not overtake your entire garden.
Harvesting Herbs
Throughout the growing season, be sure to snip herbs regularly to encourage branching and new growth. Harvest whenever you need fresh herbs but do not cut more than one third of the stem’s length. The only exception to this would be when harvesting chives or lavender which should be cut at ground level.
Preserving Herbs
To preserve freshly cut herbs, wash thoroughly and then dry them using a salad spinner and then blot the rest of any remaining moisture with paper towels. Tie the stems together with kitchen string then hang upside down in a cool, dry area that has good ventilation. Then once the herbs are dried they should be placed in clean jars and labelled and dated. Using a dehydrator which has a heat control, will dry herbs in hours rather than days.
The three greatest dangers in storing herbs are: Excess moisture, too much light and improper sealing of container. If herbs are not properly dried after washing excess moisture left on herbs will produce mold; excessive light in the drying area will cause fading and/or loss of colour; and improper sealing of storage containers will allow insects etc. to get in and contaminate the product.
Herbal Tea
Those of us that buy herbal tea tend to forget that the fragrant plants that fill our tea bags can be harvested in our own backyard. Making your own herbal tea is a lot of fun and a total matter of preference when selecting and creating flavours. The rule of thumb for brewing tea is to use only one teaspoon of dried plant material for one cup of water. Three teaspoons of any fresh herb equals one teaspoon dried. That rule only exists until you figure out the strength of tea you prefer. So then, the perfect cup of herbal tea would be to pour one cup of boiling water over one teaspoon of dried herbs or three teaspoons of fresh herbs, wait five to eight minutes and then sit back and enjoy your tea. If you steep your tea any longer it can develop a bitter taste, and if you steep it less than five minutes you will barely get the flavour from the herb.
Herbed Vinegars
The two main considerations in making herbal vinegar is the type of vinegar to be used (examples being white vinegar, apple cider vinegar, rice vinegar, champagne vinegar, sherry vinegar etc.) and the desired flavour, dictated by the choice of herb or combination of herbs. To create flavoured vinegar simply fill a jar with chopped fresh herbs, then pour in the vinegar of your choice to cover the herbs completely. Stir the contents to release any air bubbles then cover the jar using a plastic lid. Label the jar with the date made and herbs used and type of vinegar used. Leave for two to five weeks, making sure to sample each week until the desired flavour strength is reached. At that point, decant the vinegar by straining the vinegar through a cheesecloth or coffee filter into a new clean jar or bottle and create a new label with a date and the list of contents. Unopened, the vinegar will last approximately two years but once opened it should be used within six months.
Herbal Oils
When making herbal oils, like vinegars, there is a tremendous selection of oils. The popular choice is to use sunflower or safflower oil as they have the mildest taste therefore have a minimal effect on the final product allowing the flavour of the herbs to shine. The process is quite simple. Loosely fill a jar with freshly chopped herbs then pour in enough oil to cover and fill the rest of the jar covering the herbs completely. Seal and label the jar with the date and list of contents then place in a sunny spot like a window sill for three to four weeks. For the first two weeks stir the contents every day then place back on the window sill. After the four weeks, strain through a cheese cloth and bottle the herbed oil, remembering to create a new label with the date and list of contents.
These herbed vinegars and herbal oils can be used to enhance your favourite dishes. Adding them to salad dressings or pasta sauces adds depth and a joy of knowing your garden provided these delicious flavours.
General Culinary Uses
An excellent way to use herbs during barbecue season is to cut sprigs of rosemary, oregano, marjoram, cilantro, and basil and tie them together at one end with a rubber band creating a basting brush. Then proceed to baste meats, fish and vegetable with any specific marinade using the herbal basting brush. While basting the essential oils of the herbs are released onto the food along with tiny bits of the herbs. Once the food is ready to be served, cut off the tied end of the brush (then discard) and spread the remaining sprigs of herbs onto the serving platter before plating the food. The resulting aroma and taste is exceptional.
Herbs have been used for centuries to enhance the flavour of soups and stew either by adding the herbs directly or creating a small packet of herbs tied up in cheesecloth, commonly known as a “Bouquet Garni”. This herbal bouquet is typically made up of fresh parsley, marjoram, summer savory, thyme, a bay leaf and rosemary. In French cooking a well known seasoning blend is known as “Herbs de Provence” consisting of dried winter savory, thyme, rosemary, basil, tarragon and dried lavender flowers. This herb blend is delicious when used in egg dishes such as soufflés or omelettes.
The herbs you grow can also be used in potpourris, sachets, herbal butters, or to make long lasting floral displays that scent your home well beyond the growing season. As Julia Child once said “There’s no end to imagination in the kitchen.”

"Homeowners in the Highlands are realizing that, in many cases, nature does it best. Discover how using naturalist planting can enhance your cottage - and your own well-being."
Courtesy Over to Me Studio
Janice Hardy, Retired MG

The two fastest growing hobbies in North America are gardening and bird watching. Imagine combining both hobbies in your very own back yard through designing and planting a garden to attract these very special friends. To entice a variety of birds to your yard or garden, provide them with an oasis of everything they need to survive: food and water, shelter from weather and predators and a nesting place and materials. If you design your garden from a bird’s perspective, they will come.
The Birds
Many birds require different food sources – from insects to seeds; from fruit to nectar. Warblers, for example eat primarily insects while finches like seeds such as those found at bird feeders. Nectar eating birds include hummingbirds and orioles. Some will forage for seeds directly from the ground while others look for insects under fallen leaves in woodland areas. Most birds will eat two or three different types of food, but usually have a preference for one. For the safety of birds, avoid the use of pesticides.
The Plan
The first step is to evaluate your space. Birds like to be in transition areas that provide food and water, shelter and nesting areas. If your property borders on a forest you are in a perfect area to develop a transition garden. However those on smaller properties require gardeners to visualize the transition area from a fence or wall where open space on the outer edge such as a lawn gradually gives way to mature shrubs closer to the fence or wall.
Transition the garden from lower perennials and annuals to shrubs and trees. Plan for a bird bath or water feature. Birds are especially attracted to moving water so consider suspending a plastic water bottle with a small hole in the end and allowing it to drip into the bird bath. Bird feeders around the garden, in the open but close to shelter, are another feature that should be considered, especially for winter sustenance.
The Plants
Fruit producing trees and shrubs will attract birds year round with fragrant spring blooms to fall and winter berries. They also provide an environment for those insects that attract warblers and orioles. In general, shrubs can grow quite tall (1.2-2.4m; 4-8 feet), although there are some dwarf varieties of Viburnums and Rugosa. While many deciduous shrubs are hardy only to Zone 5, there are some attractive native species for the gardens of Zone 4. Plants to consider are: Dogwoods, Viburnums, Rugosas, and Sumacs.
Birds are particularly fond of the native Red Twig Dogwood (Cornus albus) whose dense thickets of branches provide shelter and food for flycatchers, kingbirds, catbirds, waxwings, woodpeckers and vireos in the spring and summer and succulent berries in fall and winter. The red foliage in fall and red stems in winter contribute additional interest to the garden.
One of the great beauties of the autumn season is the Burning Bush (Euonymus alata ‘Compactus’). It’s not native but does well in our northern gardens. It’s distinguished by unusual corky “wings” which flare out along its branches as well as vibrant scarlet foliage and small red-orange fruit in the fall enticing cedar waxwings, cardinals, robins and brown thrashers. The plant grows 1.8-3 m (6-10 feet) high but there is a smaller variety, “Rudy Haag”, growing only 1-1.5 m (3-5 feet) high and wide. This is a shrub that is best left unpruned although it can be pruned if you have space issues. It is not fussy about soil requirements (except for excessive wet areas), will grow in sun to part shade and there are no significant pest problems.
Oregon Grape (Mahonia aquifloium) is a wonderful addition to your shrub base. A broad-leaf evergreen native to western regions, the fragrant yellow flowers in spring produce spectacular blue fruit that clings to the branches over winter. Both Blue and Grey Jays, waxwings, robins, redstarts and thrashers will forage for remaining fruit during fall migration and winter.
Shrubs should be planted at the back of the garden amidst evergreens such as junipers, spruces, and pines that are often preferred nesting sites for many birds. Conifers also offer warm shelter and protection from predators and food for house finches, crossbills and red-breasted nuthatches. If space is an issue consider a coniferous shrub such as Pfitzer Juniper (Juniperus x pfitzeriana). With a mature height of 6-8 feet this shrub delights robins, warblers and catbirds with superb nesting sites.
Deciduous trees such as a hardy hawthorn, with their exquisitely fragrant blooms in spring are a magnet for migrating warblers and in fall, cedar waxwings and robins eat the fruit. Be sure to check the zone as many Hawthorn cultivars are not hardy to Zone 4.
Whether grown on a fence or climbing a tree or trellis, Vines will add a dimension of height to your garden as well as provide shelter and nesting areas to our feathered friends. Vines that flower at different times of the year or have brightly coloured foliage in the fall will add interest in all seasons. Honeysuckle (Lonicera x brownii ‘Dropmore’ Scarlet) are a favourite of hummingbirds and robins will nest in a thick clump of Clematis. Indigo Buntings prefer to nest within a vine tangle such as Boston Ivy (Parthenocissus tricuspidata). The native Virginia Creeper (Parthenocissus quinquefolia) provides winter food and spectacular colour beckoning thrushes, woodpeckers, vireos and warblers.
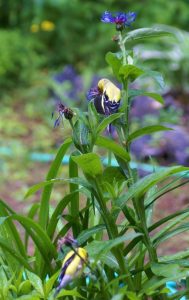
The final section of the transition garden that birds love includes herbaceous perennials, grasses and annuals. They provide seeds for ground feeders such as sparrows and dark-eyed juncos as well as nesting materials for many birds. Some plants, such as Bee Balm, Bleeding Heart and Columbine will attract the nectar eaters – hummingbirds and orioles.
 Grasses furnish sufficient shelter for finches and sparrows that prefer foraging in lower branches and also attract insects for warblers. Grasses also provide excellent nesting material and the tall grasses such as Karl Foerster(Calamagrostis x acutiflora ‘Karl Foerster’) lend themselves to planting near the back of the border with shorter grasses such as Blue Oat Grass (Helictotrichon sempervirens) as accents closer to the front of the garden.
Plant progressively from taller to lower species that bloom at a variety of times over the season to add more interest to the garden. Any perennial that produces seeds will provide food for cardinals, finches, indigo buntings, chipping sparrows, song sparrows and goldfinches. Some excellent Zone 4 perennials or annuals include spring flowering plants – Columbine, Bleeding Heart; early summer flowering plants – Coreopsis, Cosmos, Bee Balm, Daylily; mid-August to September – Purple Coneflower, Black-Eyed Susan and other Rudbeckia, Daisy, Phlox; Autumn flowering plants – Sedum, Asters; annuals for late spring to frost – Impatiens, Petunias and Zinnias.
In summary, some key points to remember:
Birds require food and water, shelter and nesting areas. A few bird friendly seed-producing perennials and a bird bath are good starters, especially for common back yard birds (Finches, sparrows, woodpeckers, chickadees and nuthatches). Avoid the use of pesticides; Transition the garden from open areas and low growing plants such as annuals and some perennials to larger and taller perennials such as Black-Eyed Susan and Coneflower to even larger shrubs and trees; Choose plants that bloom at different times of year: Examples are Columbine and Bleeding Heart for spring, Bee Balm and Daisy for summer and Asters and Sedum for fall; Add winter interest and food sources by planting evergreen shrubs and trees, plants with interesting bark such as dogwood and burning bush and vines like Virginia Creeper; You don’t need to design a brand new garden – just add some of the above featured plants and a bird bath and you are well on your way to having birds in the garden.
Resources
Bezener, Andy, Birds of Ontario, Lone Pine Publishing, 2000
Dolezal, Robert J.,Birds in Your Back Yard, Readers Digest Association, 2005
Lanicci, Rachael, Garden Secrets for Attracting BIrds, Planet Friendly Publishing, 2010
Cornell Lab of Ornithology “Bird Notes”.
Fletcher Wildlife Garden, Ottawa, Ontario
Landscape Ontario
Suite 101: On line magazine
- « Previous
- 1
- 2
- 3
- 4