

Stratification Methods
Stratification is the process in which a seed experiences a set of conditions that will break its natural dormancy so it may germinate.
If a seed just needed moisture and warm temperature to germinate, then this could happen in Autumn. A seed germinating in Autumn would probably not survive a cold winter. Evolution has taught seeds from many plants, perennial natives for example, to not germinate until they have spent a certain amount of time in a cold/moist environment, Then, under warm moist and sometime light, they germinate.
Other seeds that have no stratification period may have come from plants that don’t shed their seeds until so late in the fall the seeds never experience the conditions of warmth required to germinate. Others come from plants that are very early flowering plants that produce seed by July, ensuring sufficient time for the plant to mature so it can survive the winter.
If seeds require stratification according to the seed packet/information sheets, there are four Stratification Methods.
Late fall. In the late fall, plant seeds directly in the garden. Plant more than you need in case of critters and poor germination rate. Mark the location well. Watch for the seedlings in the spring, then thin and cultivate appropriately.
Winter Seed Sowing. Plant seeds in containers and then place them outside to await spring. They must be protected from critters and protected from drying out. Craft large clear or translucent plastic containers fashioned from jugs that contain a lid, use a plastic tote box to hold pots, use recycled plastic salad boxes or even a regular plastic flat with seed cells and a domed top.
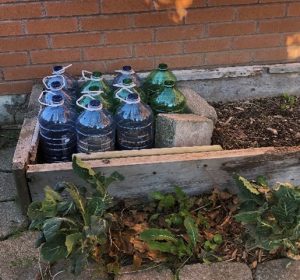

Ensure enough holes in the bottom of the seed container to allow for rain/snow melt to drain. Fill your container with moist potting soil, plant the seeds, label, and cover with a plastic dome, (Leave the lid off any jug.) Secure the domed top cover with a piece of duct tape and/or wrap twine around the entire box affair.
Place it outside in the snow in a shady area or where it will only get morning sun to avoid premature germination. Mark the spot with a stick. Come spring attend to the emerging seedlings daily by opening/closing the top and watering as required by the weather. Transplant to the garden or to small pots as appropriate.
Late Winter. Determine how long your chosen seeds need to be stratified from stratification lists or the seed package. To this number, add the amount of time your seeds require to germinate after the stratification then add the time required to raise them from germination to transplant age. Start the stratification process that number of weeks before the last spring frost date. They should be ready to transplant, but there is no hurry to plant, they have all summer to establish themselves before their first winter.
Cold Stratify in the Refrigerator. You could place the pots with your seeds planted directly in a refrigerator until they germinate. Do not cover them in the frig and keep them moist. More commonly the paper towel/coffee filter and plastic zip lock bag method is used.
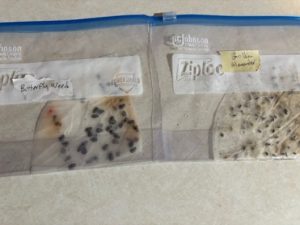
Lay a paper towel/coffee filter out flat. Fold it in half. Fold it in half again (now quarters). Unfold it so that the exposed surface area is now half of the original. Moisten the paper by misting. (Not dripping.) Place your seeds on one half of the now-moist paper (that is already folded in half once) and fold the paper along the crease previously made, so that the seeds are sandwiched between two layers of paper. Place this in a zip lock bag, seal and label. Put the bag in the frig for the required number of weeks to stratify, then pot them up and await germination (if not already). Grow them to transplant stage.
You can use moistened perlite or vermiculite in a zip lock bag instead.
Early Spring. Not enough weeks left in winter to accomplish any of the above?
Cold Stratification in the Refrigerator and Freezer. Add the days required for germination plus the days required to grow them to transplant size. That number of days before the last spring frost, begin. Follow the cold stratify in the refrigerator instructions but only put the bag in the frig for 24 hours. Then place it in the freezer for 24 hours. Repeat this 6 times. Plant the seeds in pots and await germination and growth.
Reference lists of stratification times and germination times can be found below, as well as, easy downloadable PDFs.
Just press the below buttons OR keep scrolling down
Stratification table for Herbs
Download available above
Disclaimer: Information from websites varies and may not be accurate. Always check the plant is suitable for Zone 4 Canada (Zone 3 U.S). Stratification Table Herbs


Stratification Table Flowers
Download available above
Disclaimer: Information from websites varies and may not be accurate. Always check the plant is suitable for Zone 4 Canada (Zone 3 U.S).


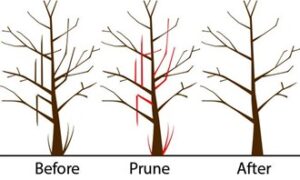
When to Prune
The best time to prune most woody plants is during the cold season when they are dormant. If circumstances force you to prune later in the season you aren’t going to kill your plant.
Why Prune Plants in Late Winter?
they are free of leaves and you can see what you are doing
the plant energy isn’t wasted on new growth that is going to be loped off
they are least susceptible to infection at this time (there are exceptions)
Some Basics
- A tree grows from the top, from its leaders. A branch doesn’t move up a tree as it grows taller. The branches on a small tree will stay at the same height from the ground all its life. It will grow new branches higher up but the original branches will stay where they are.

2. Terms used in Tree and Shrub Pruning

Some Tips
- Sterilize your pruning equipment in isopropyl alcohol after working on each plant.
- The 4 D’s: prune out the dead, diseased, damaged and dysfunctional.
- Most trees and most other plants do not require a lot of pruning– in fact, most of the time, pruning out the 4 D’s is all that is needed.
Over pruning encourages water spouts (suckering) and effects root growth, growth that is essential to surving harsh climates. - Remove sucker growth from the base of the trunk and from the interior of the tree annually.
- Any cuts that aren’t made flush to a trunk or branch should be made at least 2 cm (1”) above a bud and cut cleanly with sharp pruners or loopers.
- Don’t stake a tree any longer than one year at which time it’s stable enough to stand on its own.
- Keep mulch away from the trunk of the plant to prevent rot and rodent damage.
- Use well-rotted manure, mulch or compost to nurture trees and shrubs placing it well away from the trunk or crown and concentrating it at the drip line. Over fertilizing with nitrites will inhibit flower budding and cause excess vegetative growth making plants vulnerable to pests. Over fertilized garden centre seedlings reared on chemicals may not survive normal planting conditions.
Pruning Trees (apple, pear)
Full Size Standard Trees (under 10 years of age)
- At maturity a pruned apple or pear tree should be Xmas tree shaped. Identify your central leader. Remove double leaders.
- Choose your lowest branch – in the Haliburton Highlands make sure it is above the snow line (1 metre min.) to avoid ice damage and breakage. Now prune all branches below it.
- Now prune according to the 4 Ds.
- If there are multiple branches you may want to thin some out. You want the tree to be well balanced so choose main branches on all sides first. (mark with ribbon).
- If you need to do further pruning, follow the branch to the trunk and cut on a 45 degree angle above the branch collar (to optimize healing). Avoid pruning branches larger than 8cm (3”). Prune out branches with wide or narrow crotches. The best crotch angle (roughly the 2 o’clock or 10 o’clock angle from the center of the tree). Wider angles can break when laden with fruit and narrower angles lead to bushy growth and fruit that is too high to pick.
Prune back any lower branches that arch and grow taller than the central leader. - You can choose at this last stage to give the tree an overall haircut by heading back the long gangly stems to encourage shorter, stouter branches. Cut back 20-30% of last year’s growth. (Avoid creating bushy starbursts in unwanted places)
- Thinning out young fruit: If you have a particularly prolific tree and are concerned that a branch laden with fruit will break and you want larger but fewer fruit and good flower bud development for the next season consider thinning out the fruit. Begin thinning the fruit early when it is 1.5 cm in diameter. Starting at one end of a branch remove fruit, leaving one fruit every 15 – 20 cm (6-8”). Any earlier and you might remove leaf buds by mistake. (This fruit thinning technique applies to pommes and stone fruits.)
Check out our Heritage Apple Project here!
Pruning Stone Fruit Trees (plum, cherry, apricot)
Stone fruits are native to warmer areas of the world and growing them in Zone 4 is a challenge. They bloom earlier in the spring and can be damaged by our late frosts. They are shallow rooted, prone to drought and disease and harvest is delayed to allow for maximum sweetening. (The sugar content in stone fruit doesn’t increase after harvest.) If you like cherries try growing a Shrub Cherry instead of a tree. They are hardy and blight resistant.
Stone fruit trees are pruned in spring from bud swell to petal drop to avoid infection from canker disease. The central leader is cut to encourage an open vase shape for maximum light penetration.

Notes on Trees
- Although there are newer more cold hardy rootstocks of dwarf and semi-dwarf trees a ‘standard’ height tree will be dependably cold hardy and live for decades. If you’ve ever walked through an old abandoned orchard the trees left standing are standard height heritage apples.
- A tree will develop a stronger, more extensive root system if it has a fuller crown. Limit pruning at the time of planting to structural training and the removal of damaged branches only. Any removal of branches will reduce the capacity of the tree to produce food in the leaves and provide energy for above and below ground growth.
- In most soils, the vast majority of trees’ fibrous, absorbing roots are in the top eight inches of soil. Roots grow where conditions are best for root growth and where water and oxygen are available.
- Taproots are very uncommon in mature trees. If taproots do develop, they usually will be forced into horizontal growth when they encounter bedrock or hard subsoils beneath the surface. The entire root systems of most trees can be found within three feet of soil. The spread of the root system however, can be very extensive, often extending 2-3 times the spread of the crown.
For more information go to: http://www.hardyfruittrees.ca/tutorials/2014/01/20/how-to-prune-a-fruit-tree
Pruning Grapevines
Grapevines have to be aggressively pruned in order to yield any fruit. The vine will only produce fruit on the new branches of the year. If you let the vine make five meters of branches every year, after 3 years your vine will have to feed 15 meters of branches in order to reach the branch’s extremity where the fruit is.
Goals of Pruning
- To obtain multiple clusters of fruit
- To train the vine along a trellis, fence or conventional 2 wire structure.
When to Prune
Late fall or early spring
Types of Pruning
- To tame an overgrown Grapezilla
- Young plants and annual maintenance pruning
The Technique
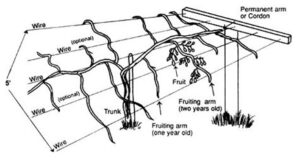
- Choose the main stem. It is the strongest stem that comes out of the ground. Then cut all the other stems coming out of the ground, just above the ground.
- On the main stem, you will have to choose 4 branches. Choose the two strongest branches from both the left and right sides. If supporting your vines with two parallel wires (like shown in the image below) choose your branches so that each of them will easily hang on the wire. Using flagging tape is a great help in identifying the branches to keep. It will also help you to avoid cutting the good branches.
- Cut all the branches, except for the 4 chosen, to 1cm from the main stem.
- Finally, on each of the 4 branches, keep two buds and cut off the branch between the second and third bud.

About Kiwi
- Male and female flowers are born on different plants, so both males and females must be planted in roughly a 1:6 ratio of males to females.
- The plants often take several years to mature and usually do not bear fruit until they are 5 to 9 years old.
- Although the plants are extremely winter hardy–tolerating temperatures as low as -30°F–they develop shoots early in the spring that are extremely sensitive to frost. In most years, there may be some shoot “burning” due to frost, although the plant usually survives, regrows, and fruits. If flowers are frosted, fruit will not develop that year.
- Hardy kiwi are extremely vigorously growing vines that require a substantial supporting trellis.

Pruning Kiwi Vine the First Year
- For the first year focus on straight growth and a strong framework. Tie the vine loosely to the post and keep it growing straight upward. Don’t allow it to twirl around the post. Remove all side branches until the vine reaches the top of the post.
- Cut out the top of the vine a few inches below the top of the post and encourage side shoots that grow laterally along the wires. Winter is the best time for pruning kiwi vine side branches along the wires. Cut them back to a point where the stems are about 1/4-inch in diameter. If the vine didn’t form good side branches at the top, cut the main trunk back by about 2 feet and try again next year.
- After the first year, focus on building strong lateral growth along the wires. Lead the branches near the top of the vine to the wires and fasten them in place every 18 to 24 inches. Cut the vine to keep it from extending beyond the wires. Remove shoots that are twisting around other shoots or taking off in the wrong direction.
How to Prune an Overgrown Kiwi
- Remove all of the branches that wind around the kiwi trellis. Also, remove vine sections wound around other branches or nearby plants. Using sharp, sterilized pruners make a clean cut about one inch (2.5 cm.) from the main vine.
- The next step is to trim out cross branches. This includes branches growing over or crossing other branches. Also, trim out shoots growing straight out from the stem since these will not bear fruit.
- Select a principal stem for the kiwi vine and train this straight up a trellis. It should get some 6 feet long. Just beyond this point, allow two lateral side shoots to grow over the trellis. Prune these back to three buds, then remove all other lateral shoots.
Read more at Gardening Know How: https://www.gardeningknowhow.com/edible/fruits/kiwi/pruning-kiwi-vines.htm
https://extension.psu.edu/hardy-kiwi-in-the-home-fruit-planting
Need a primer or a refresher on how to start a veggie garden? We couldn’t have laid it out any better than Sharon Hanna whose article appears in Garden Making Magazine.
With permission we’re providing you the link to some great information that we’ve vetted to ensure that it meets with the challenging growing conditions here in the Highlands.
View Sharon Hanna’s How to Plan a Vegetable Garden HERE.


Crop Rotation is not just for Farmers
You are what you eat! In this day and age when increasing attention is paid to the quality of the food we eat, more and more people want to grow their own food. As a hallmark for sustainable farming, crop rotation minimizes problems down the road while preserving soil structure and health.
Crop rotation is not just for the farmers. It can be put to use in small plots of land as well. By rotating crops each season; we promote a natural method of pest control which helps to break disease cycles that can occur when the same crop is grown in the same spot for successive years. For example, Clubroot is a soil borne fungus that affects brassicas, and accumulates from successive growth in the same location. Mono cropping also depletes the soil of nutrients specific to that crop. In the same way our bodies can ache if we do the same thing over and over, the soil can get tired if we plant the same vegetable, year after year in the same spot.
Simply put, crop rotation requires you to avoid growing the same crop in the same spot year after year. Plant your like family vegetables in a different spot than the previous year and rotate your different crops like a cycle. It’s helpful that some vegetables will replenish lost nutrients back to the soil after a crop has been harvested. It helps to grow legumes after heavy feeders like corn or leafy vegetables. While you’re at it, add in some green manure like clover to enrich the soil. No matter what vegetables you are growing, there are many rotations to suit your needs. You decide!
Remember that any crop rotation is a work in progress, and much of the enjoyment and challenge comes from experimenting with it each year as you learn from previous years. By keeping in mind a few things, it will make it much easier to work out a suitable rotation for you.
- Know botanical names of your vegetables and group vegetables from the same family together
- Explore the internet as there are a wealth of resources
- Keep a notebook to record observations and keep accurate records
- Grow green manure as it enriches the soil like essential nutrients for the body
- Alternate deep rooted and shallow rooted crops to promote a balanced draw
- Leafy vegetables generally use a lot of nitrogen so plant soil builders like beans prior to growing lettuce
Some basic types of groupings that may work for you include: heavy feeders (broccoli, lettuce, tomatoes, eggplant, corn, squash); light feeders (carrots, turnips, sweet potatoes, peppers, garlic, onions, chives); nitrogen fixing (soil builders – green beans, lima beans, peas, soybeans); green manures (clover, vetch, alfalfa, rye, buckwheat).
Article written by Shane Rajapakse for the MGOI newsletter and reprinted here with permission.
Editor’s Note: More gardeners are practicing a technique called chop and drop. Essentially you cut back your weeds and grasses before they go to seed and leave them on your garden as green manure mulch. The nutrients are available immediately to the plants and the mulch helps the soil to retain moisture, repress weeds and improve soil structure.
General Care:
- Mulch to conserve moisture and reduce weeds.
- Water 1 inch per week from spring until after harvest.
- Roses are heavy feeders.
- Spring: Fertilize with a slow release, balanced fertilizer.
- Throughout season: Feed every 4 weeks.
- Late summer, early fall: Stop fertilizing 6 – 8 weeks before frost date in preparation for winter.
- NOTE: Very sharp thorns. Wear gloves when handling.
Pests & Diseases:
- Susceptible to rose borers, powdery mildew, and fungus.
Late Winter/Early Spring Pruning Steps (start of new growth):
- Remove all remaining leaves.
- Prune dead wood back to the base.
- Prune out crossing branches. Ideally create an open vase-like shape to increase air circulation.
- Remove thin and weak growth (anything thinner than a pencil).
- Shape the remaining canes into desired shape by cutting ¼” – ½” above an outward facing bud, at an angle sloping away from the bud.
- Dispose of any leaves and waste to prevent spread of disease.
Fall Pruning (after killing frost):
- Prune only as needed for winter preparation.
- Trim longer stems to keep from snapping in winter storms.
- Trim crossed branches to prevent rubbing.
- Remove dead/diseased branches and foliage.


General Care:
- Mulch to conserve moisture and reduce weeds.
- Water 1 inch per week from spring until after harvest.
- Keep bushes tidy by removing “suckers” that grow outside of designated rows. This prevents loss of nutrients used to grow the canes which will reduce berry size of next years crop.
Pests & Diseases:
- June through August watch for spider mites and Japanese beetles. Also susceptible to cane borers and powdery mildew.
- Rabbits will eat canes in the winter. Prevent with chicken wire fence.
Ever-bearing Raspberries AKA Fall-bearing Raspberries
- Fruit on first year of growth.
- After fruiting in fall, cut all canes to the ground. No pruning is required during the growing season.
- Clean up all debris to avoid disease and pests over winter.
- NOTE: To harvest both a fall and following summer crop, do not remove the primocanes that produced the fall crop. Prune them back in spring to 12 inches to the last visible node that had fruit and cut off dead tips.
Summer Fruiting Raspberries
- Produces fruit on 2-year-old canes.
- In the fall, cut canes to the ground that produced berries. These older canes are brown. Do not cut the new green canes as they will fruit next year.
4 Easy steps to Pruning Red Raspberries:
- Remove last year’s floricanes
- Narrow the row width to 1.5 – 2 feet
- Cut out the weaklings. You only want the tallest, thickest and healthiest looking canes left.
- Attach remaining canes to a V-shaped trellis. This design has 2 parallel wires spaced 3 feet apart and approximately 4 feet high. Attach canes to the trellis using twine. Tie canes so half are on one side of the row and half on the other side, approximately 1 every 4 inches. This promotes air circulation and encourages new growth in the center for next year. In addition, fruit will be on the outside for easier picking.


Mineral soils consist of four major components:
1. Mineral Materials
- sand, silt and clay are the 3 major components of the mineral fraction of soil
- they account for 45%-50% of the total soil volume
- sand and silt particles are derived from quartz and feldspar
- gravel and sand can be seen with the naked eye
- a magnifying glass is necessary to see silt particles
- clay particles are derived from silica and aluminum oxides
2. Organic Matter
- consists of dead and decaying plants and animals.
- is critical for gardening success because:
- improves the soil’s physical structure
- holds and releases plant nutrients
- increases the water holding capacity of the soil
- increases beneficial organisms in the soil
3. Water and 4. Air
- are found in the pore spaces between mineral and organic components
- account for about 50% of total soil volume
- are essential for the growth of plant roots and soil microbes
- dissolve most plant nutrients
Soil porosity is a measure of the pore space volume of a given soil:
- sandy soils have large pore spaces which promote rapid drainage of water and leaching of nutrients and organic matter
- clay soils contain tiny pore spaces which may impede root growth and water drainage
- increasing organic matter increases the soil’s porosity and capacity to hold water
Air is pushed out when water comes into the soil from precipitation or irrigation of groundwater. If air is unavailable to plant roots for too long, the plant suffers from lack of oxygen. Some water is used by plants, some is lost through evaporation, and some moves so deep into the soil the plant roots cannot reach it.
Soil Layers (Horizons)
Ontario soils have at least 3 distinct layers that differ in colour, texture, consistency, and structure.
1. Surface Soil
- contains most of the organic matter and plant roots
- provides most of the nutrients and water to plants
2. Subsoil
- consists of small clay particles that are carried down by gravity and rainfall
- is lower in organic matter
- provides storage space for water and nutrients
- helps regulate the soil temperature and air supply of plant roots
3. Parent Material
- is made up of decomposed rock characteristic of the bedrock
- influences the soil’s texture, fertility, acidity, and depth
Soil Structure
In each textural class there is a range in the amounts of sand, silt, and clay that can be present. Most surface soils in Ontario fall into five textural classes. Each class name indicates relative amounts of sand, silt and clay in the soil.

1. Silt loam
2. Loam
3. Silty clay loam
4. Sandy loam
5. Clay Loam
General Care:
- Mulch to conserve moisture and reduce weeds.
- Water 1 inch per week from spring until after harvest.
- Every 3-4 years fertilize in early spring with a balanced fertilizer (10-10-10).
- Can be grown in containers, trained up a trellis, pruned into small trees or maintained as a small shrub.
NOTE: Very sharp thorns. Wear gloves when handling and picking berries.
Pests & Diseases:
- Susceptible to powdery mildew and fungus.
Winter/Early Spring Pruning Steps (bush still dormant):
- Remove dead and diseased wood.
- Remove tangled, crossed, overcrowded or branches touching the ground.
Branches that are left, make the following cuts just above an outward facing bud:
- Cut back the previous seasons grown by half.
- Cut back side branches between 1 and 3 buds from the base of the shoot.
- Remove any suckers growing away from the main stem.
NOTE: For established plants, remove canes over 4 years old. Ideal bush has about a dozen canes at any one time, half being new shoots and other half a mix of 2- and 3-year-old canes.
Summer Pruning (mid-June):
- Pruning of new growth will improve air circulation. Shorten new growth tips to 5 leaves.


So you’re a flower grower, not a vegetable grower? Did you know that vegetables are actually easier to grow, taste better than grocery store purchases and do not have poisons on or in them (unless you do it). The seeds are cheaper than nursery plants, though granted your produce will be more expensive than in-season store bought vegetables when you consider your time and energy spent – but much more satisfying to eat.

Do not picture acres of row on row of vegetables which means you must harvest, clean, freeze and store vast quantities of produce. Eating cabbages, beans and potatoes until you turn green. No. Simply interplant only your favourites amongst your flowers. Perhaps a pepper or tomato plant. A few radishes, beets, swiss chard or red Russian kale. (In France I saw dill waving in the breeze interplanted with the flowers in the boulevards and rosemary hedges.)
Seed companies now sell many vegetables that grow only to mini sizes. You could even have little carrots in your planters so that you have pretty feathery green leaves. Consider that garlic is a companion plant to roses. Since the former must be planted in the fall you can get it into the ground when you hill up those roses. A 12 inch pot of mesclun (mixed lettuces) is very attractive and will supply you with plenty of salads. Just keep picking those outside leaves and remove any blossom stems.
Vegetables are healthy food. They are better tasting than lilac blossoms, violets and day lily flowers. But I must admit nasturtium leaves should be given a chance by dedicated vegetable growers.
Check out some of our articles on growing food and have fun!

It’s the new year, and if you are like us Haliburton County Master Gardeners, these -20℃ nights lately have us dreaming of spring. And even though the ground is frozen and covered in a few feet of snow, there is plenty you can do to prepare for your 2025 garden and landscaping goals. Is it time to really naturalize your shoreline? Looking to attract pollinators? Whatever your goals, planting more native plants is almost always the answer.
Reminder! In Canada, there are 10 identified Plant Hardiness Zones that take into account a wide range of factors including snowfall, elevation, wind and others. The higher the zone number, the warmer the climate. Haliburton County is a Zone 4 region.
Why Plant Native Plants?
Native plants are plant species that naturally occur in a specific region or ecosystem without human introduction. They have spent thousands of years evolving to not only be resilient to the climate of their region but also support the local environment including reducing erosion (hello shorelines), stabilizing soil and providing shelter and sustenance for local wildlife.
Six Native Plants to Get You Started in 2025
The following plants are native species that are also considered ‘keystone plants’. Keystone plants attract more wildlife and are particularly beneficial to native insects. We recommend the following plants and other keystone species make the backbone of your plantings.
Note: To see a larger selection of Native Plants that we recommend, including more ornamental plants and a larger range that would work for the sun and moisture levels of your property, be sure to grab your copy of the Guidebook to Ecological Landscaping in the Highlands available for purchase at businesses across the county.
- Red Oak (Quercus rubra)
- Basswood (Tilia americana)
- Serviceberry (Amelanchier)
- Highbush Cranberry (Viburnum trilobum)
- Red Osier Dogwood (Cornus sericea)
- Meadowsweet (Spiraea alba var latifolia)

Red Osier Dogwood along Minden Riverwalk (photo credit: Shelley Fellows)

Serviceberry in bloom (photo credit: Shelley Fellows)

Meadowsweet, also along the Minden Riverwalk (photo credit: Shelley Fellows)

Highbush Cranberry (photo credit: Carolyn Langdon)
As with any planting, you want to take into consideration the various environmental elements that your property has. Where is it shady versus more consistently full sun? How moist is your soil and what is the natural drainage like? What wildlife and pollinators do you want to host?
These are all questions to consider, among others, when researching which native plants to bring to your landscape. The Haliburton County Master Gardeners can support you with a donation-based consultation or – if you’re up for your own research and reading – we recommend grabbing your own copy of our Guidebook for Ecological Landscaping in the Highlands as a starting point.
Stay warm, and happy researching!