• Skip to primary navigation
  • Skip to main content

Haliburton County Master Gardeners

Gardening in Haliburton County

sign up
site search
  • Ask a Question
    • MG Questions Answered
  • Request a Consult
  • Resources
    • Garden with Nature
      • For Your Property Including Shorelines
      • Go Wild
      • Invasives
      • Native Plants & Native Shorelines
      • Sunny Sites
      • Trees
      • Woodland
    • Gardening for Guilty Pleasure
      • Perennials
      • Planning and Design
    • Growing Food
      • Fruits
      • Herbs
      • Native Edibles
      • Pruning and Other Practices
      • Vegetables
      • Soil
    • Native Plants
      • Selection of Native Plants for the Highlands
    • Zone 4 Challenges
      • Pests
      • Tips
      • Wildlife
    • Useful Links
      • Canoe Radio Podcasts
      • County Life Magazine
      • MGOI Website
      • Videos
  • Guidebook
  • About
    • How to Become a Master Gardener
  • What’s On
    • Events Calendar
    • Butterflyway Project
    • Stepping into Nature
  • Buy Local
  • Contact
  • Facebook logo
  • YouTube logo
  • Printer icon graphic

Ruthie Cummings

Germination and Stratification methods

March 22, 2026

Stratification Methods

Stratification is the process in which a seed experiences a set of conditions that will break its natural dormancy so it may germinate.

If a seed just needed moisture and warm temperature to germinate, then this could happen in Autumn. A seed germinating in Autumn would probably not survive a cold winter. Evolution has taught seeds from many plants, perennial natives for example, to not germinate until they have spent a certain amount of time in a cold/moist environment, Then, under warm moist and sometime light, they germinate.

Other seeds that have no stratification period may have come from plants that don’t shed their seeds until so late in the fall the seeds never experience the conditions of warmth required to germinate. Others come from plants that are very early flowering plants that produce seed by July, ensuring sufficient time for the plant to mature so it can survive the winter.

If seeds require stratification according to the seed packet/information sheets, there are four Stratification Methods.

Late fall. In the late fall, plant seeds directly in the garden. Plant more than you need in case of critters and poor germination rate. Mark the location well. Watch for the seedlings in the spring, then thin and cultivate appropriately.

Winter Seed Sowing. Plant seeds in containers and then place them outside to await spring. They must be protected from critters and protected from drying out. Craft large clear or translucent plastic containers fashioned from jugs that contain a lid, use a plastic tote box to hold pots, use recycled plastic salad boxes or even a regular plastic flat with seed cells and a domed top.

Winter sowingWinter Sowing

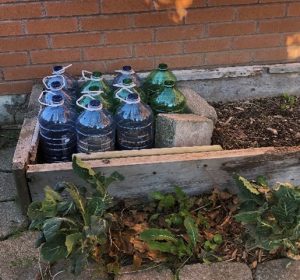
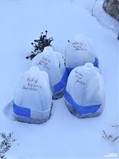
Ensure enough holes in the bottom of the seed container to allow for rain/snow melt to drain. Fill your container with moist potting soil, plant the seeds, label, and cover with a plastic dome, (Leave the lid off any jug.) Secure the domed top cover with a piece of duct tape and/or wrap twine around the entire box affair.

Place it outside in the snow in a shady area or where it will only get morning sun to avoid premature germination. Mark the spot with a stick. Come spring attend to the emerging seedlings daily by opening/closing the top and watering as required by the weather. Transplant to the garden or to small pots as appropriate.

Late Winter.  Determine how long your chosen seeds need to be stratified from stratification lists or the seed package. To this number, add the amount of time your seeds require to germinate after the stratification then add the time required to raise them from germination to transplant age. Start the stratification process that number of weeks before the last spring frost date. They should be ready to transplant, but there is no hurry to plant, they have all summer to establish themselves before their first winter.

Cold Stratify in the Refrigerator. You could place the pots with your seeds planted directly in a refrigerator until they germinate. Do not cover them in the frig and keep them moist. More commonly the paper towel/coffee filter and plastic zip lock bag method is used.

Forced Germination

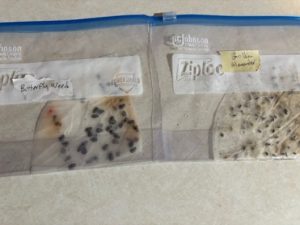
Lay a paper towel/coffee filter out flat. Fold it in half. Fold it in half again (now quarters). Unfold it so that the exposed surface area is now half of the original. Moisten the paper by misting. (Not dripping.) Place your seeds on one half of the now-moist paper (that is already folded in half once) and fold the paper along the crease previously made, so that the seeds are sandwiched between two layers of paper. Place this in a zip lock bag, seal and label. Put the bag in the frig for the required number of weeks to stratify, then pot them up and await germination (if not already). Grow them to transplant stage.

You can use moistened perlite or vermiculite in a zip lock bag instead.

Early Spring. Not enough weeks left in winter to accomplish any of the above?

Cold Stratification in the Refrigerator and Freezer. Add the days required for germination plus the days required to grow them to transplant size. That number of days before the last spring frost, begin. Follow the cold stratify in the refrigerator instructions but only put the bag in the frig for 24 hours. Then place it in the freezer for 24 hours. Repeat this 6 times. Plant the seeds in pots and await germination and growth.

Reference lists of stratification times and germination times can be found below, as well as, easy downloadable PDFs.

Just press the below buttons OR keep scrolling down

Stratification Table Herbs PDF download
Stratification Wildflowers PDF download
NAPS Germination requirements PDF download

Stratification table for Herbs

 Download available above

Disclaimer: Information from websites varies and may not be accurate. Always check the plant is suitable for Zone 4 Canada (Zone 3 U.S). Stratification Table Herbs

    Strat Eco 3
    Stat Eco 2
    Strat Eco 1

Stratification Table Flowers

Download available above

Disclaimer: Information from websites varies and may not be accurate. Always check the plant is suitable for Zone 4 Canada (Zone 3 U.S).

    Strat Flowers 1
    Strat Flowers 2
    Strat Flowers 3
NAPS 2017 Germination Requirements
Screenshot

Filed Under: Growing Food, Tips

Native Plants for Your Property Including Shorelines

August 4, 2024

Native Plants for Your Property Including Shorelines

There are many good reasons to maintain a backbone of native plants with the exotic ornamental plants acting as accent or highlight plantings, particularly along shorelines. Use this 75 page directory to identify the natives you have and others you may wish to plant.

View PDF here>

Filed Under: For Your Property Including Shorelines, Garden with Nature

Guidebook to Ecological Landscaping in the Highlands

May 10, 2024

Detailed Guidebook to gardening in the Highlands released

A recent write up on the new Guidebook by Grounded Gardens in Haliburton

Press picture to follow the link

The Haliburton County Master Gardeners are proud to announce the release of the “Guide to Ecological Landscaping in the Haliburton Highlands”. Written and published by the Haliburton County Master Gardeners, this 72 page booklet is packed with recommendations specific to the unique conditions in the region of Haliburton County.

Proceeds of the sale of this Guidebook support the Haliburton County Master Gardeners. Guidebooks will be available for purchase at the Haliburton Home and Cottage Show (link: https://www.haliburtonmastergardener.ca/events/), and at the following locations:

The Guidebook is available for purchase for loan from the following Library locations:

Haliburton: 
Haliburton County Public Library – Minden and Haliburton branches

The Guidebook is available for purchase for $10 from the following locations:

Haliburton: 

Country Rose Garden Centre
Grounded Gardens at the Lucas House (Highlander office)
 
West Guildford:
Abbey Gardens
Minden:
Rising Thymes
Carnarvon:
Pine Reflections Garden Centre
They are $10 each tax included.

More information on the guide is available here: https://www.haliburtonmastergardener.ca/category/guidebook/

Filed Under: Guidebook

Cooking with Herbs

September 25, 2021

In our gardens, many of us have space for, or may already grow an herb garden but feel more comfortable keeping these fragrant plants outside. These delicate plants can very easily be brought into your kitchen to enrich your cooking and your lives.

Growing and cooking with fresh herbs can be an extremely rewarding experience. Not only do you have beautiful fresh herbs throughout summer and fall but if harvested and dried properly you can have a bountiful supply of herbs throughout the winter and spring months until once again your new harvest comes in the following summer. Imagine walking out to your herb garden and snipping just the right amount needed for a recipe as opposed to going to the market being forced to buy a large overly-priced container of an herb such as oregano when all you need is one or two teaspoons. That in itself is worth the effort of growing your own herbs.

A good idea is to plant only those herbs that you will cook with or use to make herbal teas, vinegars and oils. An excellent selection of herbs to start with would be basil, chives, cilantro, dill weed, fennel, mint, oregano, parsley, rosemary, sage, sweet marjoram, tarragon, and lemon thyme. Many aromatic herbs such as mint, parsley, sage and rosemary tend to repel certain insects therefore making valuable garden companions for vulnerable plants. Dill, balm, and thyme are some of the herbs that attract bees which pollinate other plants. Therefore, keep in mind companion planting when deciding on where to plant each herb. But as delicate as these herbs are, aggressive growers such as mint and oregano should be contained in pots so they do not overtake your entire garden.

Harvesting Herbs

Throughout the growing season, be sure to snip herbs regularly to encourage branching and new growth. Harvest whenever you need fresh herbs but do not cut more than one third of the stem’s length. The only exception to this would be when harvesting chives or lavender which should be cut at ground level.

Preserving Herbs

To preserve freshly cut herbs, wash thoroughly and then dry them using a salad spinner and then blot the rest of any remaining moisture with paper towels. Tie the stems together with kitchen string then hang upside down in a cool, dry area that has good ventilation. Then once the herbs are dried they should be placed in clean jars and labelled and dated. Using a dehydrator which has a heat control, will dry herbs in hours rather than days.

The three greatest dangers in storing herbs are: Excess moisture, too much light and improper sealing of container. If herbs are not properly dried after washing excess moisture left on herbs will produce mold; excessive light in the drying area will cause fading and/or loss of colour; and improper sealing of storage containers will allow insects etc. to get in and contaminate the product.

Herbal Tea

Those of us that buy herbal tea tend to forget that the fragrant plants that fill our tea bags can be harvested in our own backyard. Making your own herbal tea is a lot of fun and a total matter of preference when selecting and creating flavours. The rule of thumb for brewing tea is to use only one teaspoon of dried plant material for one cup of water. Three teaspoons of any fresh herb equals one teaspoon dried. That rule only exists until you figure out the strength of tea you prefer. So then, the perfect cup of herbal tea would be to pour one cup of boiling water over one teaspoon of dried herbs or three teaspoons of fresh herbs, wait five to eight minutes and then sit back and enjoy your tea. If you steep your tea any longer it can develop a bitter taste, and if you steep it less than five minutes you will barely get the flavour from the herb.

Herbed Vinegars

The two main considerations in making herbal vinegar is the type of vinegar to be used (examples being white vinegar, apple cider vinegar, rice vinegar, champagne vinegar, sherry vinegar etc.) and the desired flavour, dictated by the choice of herb or combination of herbs. To create flavoured vinegar simply fill a jar with chopped fresh herbs, then pour in the vinegar of your choice to cover the herbs completely. Stir the contents to release any air bubbles then cover the jar using a plastic lid. Label the jar with the date made and herbs used and type of vinegar used. Leave for two to five weeks, making sure to sample each week until the desired flavour strength is reached. At that point, decant the vinegar by straining the vinegar through a cheesecloth or coffee filter into a new clean jar or bottle and create a new label with a date and the list of contents. Unopened, the vinegar will last approximately two years but once opened it should be used within six months.

Herbal Oils

When making herbal oils, like vinegars, there is a tremendous selection of oils. The popular choice is to use sunflower or safflower oil as they have the mildest taste therefore have a minimal effect on the final product allowing the flavour of the herbs to shine. The process is quite simple. Loosely fill a jar with freshly chopped herbs then pour in enough oil to cover and fill the rest of the jar covering the herbs completely. Seal and label the jar with the date and list of contents then place in a sunny spot like a window sill for three to four weeks. For the first two weeks stir the contents every day then place back on the window sill. After the four weeks, strain through a cheese cloth and bottle the herbed oil, remembering to create a new label with the date and list of contents.

These herbed vinegars and herbal oils can be used to enhance your favourite dishes. Adding them to salad dressings or pasta sauces adds depth and a joy of knowing your garden provided these delicious flavours.

General Culinary Uses

An excellent way to use herbs during barbecue season is to cut sprigs of rosemary, oregano, marjoram, cilantro, and basil and tie them together at one end with a rubber band creating a basting brush. Then proceed to baste meats, fish and vegetable with any specific marinade using the herbal basting brush. While basting the essential oils of the herbs are released onto the food along with tiny bits of the herbs. Once the food is ready to be served, cut off the tied end of the brush (then discard) and spread the remaining sprigs of herbs onto the serving platter before plating the food. The resulting aroma and taste is exceptional.

Herbs have been used for centuries to enhance the flavour of soups and stew either by adding the herbs directly or creating a small packet of herbs tied up in cheesecloth, commonly known as a “Bouquet Garni”. This herbal bouquet is typically made up of fresh parsley, marjoram, summer savory, thyme, a bay leaf and rosemary. In French cooking a well known seasoning blend is known as “Herbs de Provence” consisting of dried winter savory, thyme, rosemary, basil, tarragon and dried lavender flowers. This herb blend is delicious when used in egg dishes such as soufflés or omelettes.

The herbs you grow can also be used in potpourris, sachets, herbal butters, or to make long lasting floral displays that scent your home well beyond the growing season. As Julia Child once said “There’s no end to imagination in the kitchen.”

Filed Under: Growing Food, Herbs

Attracting Birds to Your Property

April 25, 2019

Courtesy Over to Me Studio
Janice Hardy, Retired MG

Bird in Tree

The two fastest growing hobbies in North America are gardening and bird watching. Imagine combining both hobbies in your very own back yard through designing and planting a garden to attract these very special friends. To entice a variety of birds to your yard or garden, provide them with an oasis of everything they need to survive: food and water, shelter from weather and predators and a nesting place and materials. If you design your garden from a bird’s perspective, they will come.

The Birds

Many birds require different food sources – from insects to seeds; from fruit to nectar. Warblers, for example eat primarily insects while finches like seeds such as those found at bird feeders. Nectar eating birds include hummingbirds and orioles. Some will forage for seeds directly from the ground while others look for insects under fallen leaves in woodland areas. Most birds will eat two or three different types of food, but usually have a preference for one. For the safety of birds, avoid the use of pesticides.

The Plan

The first step is to evaluate your space. Birds like to be in transition areas that provide food and water, shelter and nesting areas. If your property borders on a forest you are in a perfect area to develop a transition garden. However those on smaller properties require gardeners to visualize the transition area from a fence or wall where open space on the outer edge such as a lawn gradually gives way to mature shrubs closer to the fence or wall.
Transition the garden from lower perennials and annuals to shrubs and trees. Plan for a bird bath or water feature. Birds are especially attracted to moving water so consider suspending a plastic water bottle with a small hole in the end and allowing it to drip into the bird bath. Bird feeders around the garden, in the open but close to shelter, are another feature that should be considered, especially for winter sustenance.

The Plants

Fruit producing trees and shrubs will attract birds year round with fragrant spring blooms to fall and winter berries. They also provide an environment for those insects that attract warblers and orioles. In general, shrubs can grow quite tall (1.2-2.4m; 4-8 feet), although there are some dwarf varieties of Viburnums and Rugosa. While many deciduous shrubs are hardy only to Zone 5, there are some attractive native species for the gardens of Zone 4. Plants to consider are: Dogwoods, Viburnums, Rugosas, and Sumacs.

Birds are particularly fond of the native Red Twig Dogwood (Cornus albus) whose dense thickets of branches provide shelter and food for flycatchers, kingbirds, catbirds, waxwings, woodpeckers and vireos in the spring and summer and succulent berries in fall and winter. The red foliage in fall and red stems in winter contribute additional interest to the garden.

One of the great beauties of the autumn season is the Burning Bush (Euonymus alata ‘Compactus’). It’s not native but does well in our northern gardens. It’s distinguished by unusual corky “wings” which flare out along its branches as well as vibrant scarlet foliage and small red-orange fruit in the fall enticing cedar waxwings, cardinals, robins and brown thrashers. The plant grows 1.8-3 m (6-10 feet) high but there is a smaller variety, “Rudy Haag”, growing only 1-1.5 m (3-5 feet) high and wide. This is a shrub that is best left unpruned although it can be pruned if you have space issues. It is not fussy about soil requirements (except for excessive wet areas), will grow in sun to part shade and there are no significant pest problems.

Oregon Grape (Mahonia aquifloium) is a wonderful addition to your shrub base. A broad-leaf evergreen native to western regions, the fragrant yellow flowers in spring produce spectacular blue fruit that clings to the branches over winter. Both Blue and Grey Jays, waxwings, robins, redstarts and thrashers will forage for remaining fruit during fall migration and winter.

Shrubs should be planted at the back of the garden amidst evergreens such as junipers, spruces, and pines that are often preferred nesting sites for many birds. Conifers also offer warm shelter and protection from predators and food for house finches, crossbills and red-breasted nuthatches. If space is an issue consider a coniferous shrub such as Pfitzer Juniper (Juniperus x pfitzeriana). With a mature height of 6-8 feet this shrub delights robins, warblers and catbirds with superb nesting sites.

Deciduous trees such as a hardy hawthorn, with their exquisitely fragrant blooms in spring are a magnet for migrating warblers and in fall, cedar waxwings and robins eat the fruit. Be sure to check the zone as many Hawthorn cultivars are not hardy to Zone 4.

Whether grown on a fence or climbing a tree or trellis, Vines will add a dimension of height to your garden as well as provide shelter and nesting areas to our feathered friends. Vines that flower at different times of the year or have brightly coloured foliage in the fall will add interest in all seasons. Honeysuckle (Lonicera x brownii ‘Dropmore’ Scarlet) are a favourite of hummingbirds and robins will nest in a thick clump of Clematis. Indigo Buntings prefer to nest within a vine tangle such as Boston Ivy (Parthenocissus tricuspidata). The native Virginia Creeper (Parthenocissus quinquefolia) provides winter food and spectacular colour beckoning thrushes, woodpeckers, vireos and warblers.

The final section of the transition garden that birds love includes herbaceous perennials, grasses and annuals. They provide seeds for ground feeders such as sparrows and dark-eyed juncos as well as nesting materials for many birds. Some plants, such as Bee Balm, Bleeding Heart and Columbine will attract the nectar eaters – hummingbirds and orioles.

Yellow Finches on Bachelor ButtonsGrasses furnish sufficient shelter for finches and sparrows that prefer foraging in lower branches and also attract insects for warblers. Grasses also provide excellent nesting material and the tall grasses such as Karl Foerster(Calamagrostis x acutiflora ‘Karl Foerster’) lend themselves to planting near the back of the border with shorter grasses such as Blue Oat Grass (Helictotrichon sempervirens) as accents closer to the front of the garden.

Plant progressively from taller to lower species that bloom at a variety of times over the season to add more interest to the garden. Any perennial that produces seeds will provide food for cardinals, finches, indigo buntings, chipping sparrows, song sparrows and goldfinches. Some excellent Zone 4 perennials or annuals include spring flowering plants – Columbine, Bleeding Heart; early summer flowering plants – Coreopsis, Cosmos, Bee Balm, Daylily; mid-August to September – Purple Coneflower, Black-Eyed Susan and other Rudbeckia, Daisy, Phlox; Autumn flowering plants – Sedum, Asters; annuals for late spring to frost – Impatiens, Petunias and Zinnias.

In summary, some key points to remember:

Birds require food and water, shelter and nesting areas. A few bird friendly seed-producing perennials and a bird bath are good starters, especially for common back yard birds (Finches, sparrows, woodpeckers, chickadees and nuthatches). Avoid the use of pesticides; Transition the garden from open areas and low growing plants such as annuals and some perennials to larger and taller perennials such as Black-Eyed Susan and Coneflower to even larger shrubs and trees; Choose plants that bloom at different times of year: Examples are Columbine and Bleeding Heart for spring, Bee Balm and Daisy for summer and Asters and Sedum for fall; Add winter interest and food sources by planting evergreen shrubs and trees, plants with interesting bark such as dogwood and burning bush and vines like Virginia Creeper; You don’t need to design a brand new garden – just add some of the above featured plants and a bird bath and you are well on your way to having birds in the garden.

Resources
Bezener, Andy, Birds of Ontario, Lone Pine Publishing, 2000
Dolezal, Robert J.,Birds in Your Back Yard, Readers Digest Association, 2005
Lanicci, Rachael, Garden Secrets for Attracting BIrds, Planet Friendly Publishing, 2010

Cornell Lab of Ornithology “Bird Notes”.
Fletcher Wildlife Garden, Ottawa, Ontario
Landscape Ontario
Suite 101: On line magazine

Filed Under: Garden with Nature, Sunny Sites, Tips, Wildlife

coordinator@haliburtonmastergardener.ca

privacy policy

Haliburton County Development Corporation logo


HCMG logo
Member Login
  • Ask a Question
  • Resources
  • About
  • News & Events

Follow us on YouTube badge

  • Newsletter Signup
  • Contact
  • Buy Local

© 2026 HaliburtonMasterGardener.ca   •   Website Development by TechnicalitiesPlus Inc.