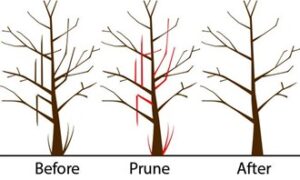
• Skip to primary navigation
  • Skip to main content

Haliburton County Master Gardeners

Gardening in Haliburton County

sign up
site search
  • Ask a Question
    • MG Questions Answered
  • Request a Consult
  • Resources
    • Garden with Nature
      • For Your Property Including Shorelines
      • Go Wild
      • Invasives
      • Native Plants & Native Shorelines
      • Sunny Sites
      • Trees
      • Woodland
    • Gardening for Guilty Pleasure
      • Perennials
      • Planning and Design
    • Growing Food
      • Fruits
      • Herbs
      • Native Edibles
      • Pruning and Other Practices
      • Vegetables
      • Soil
    • Native Plants
      • Selection of Native Plants for the Highlands
    • Zone 4 Challenges
      • Pests
      • Tips
      • Wildlife
    • Useful Links
      • Canoe Radio Podcasts
      • County Life Magazine
      • MGOI Website
      • Videos
  • Guidebook
  • About
    • How to Become a Master Gardener
  • What’s On
    • Events Calendar
    • Butterflyway Project
    • Stepping into Nature
  • Buy Local
  • Contact
  • Facebook logo
  • YouTube logo
  • Printer icon graphic

Alison

General Pruning Tips

January 5, 2026

When to Prune

The best time to prune most woody plants is during the cold season when they are dormant. If circumstances force you to prune later in the season you aren’t going to kill your plant.

Why Prune Plants in Late Winter?

they are free of leaves and you can see what you are doing
the plant energy isn’t wasted on new growth that is going to be loped off
they are least susceptible to infection at this time (there are exceptions)

Some Basics

  1. A tree grows from the top, from its leaders. A branch doesn’t move up a tree as it grows taller. The branches on a small tree will stay at the same height from the ground all its life. It will grow new branches higher up but the original branches will stay where they are.


2. Terms used in Tree and Shrub Pruning

Pruning Terms


Some Tips

  • Sterilize your pruning equipment in isopropyl alcohol after working on each plant.
  • The 4 D’s: prune out the dead, diseased, damaged and dysfunctional.
  • Most trees and most other plants do not require a lot of pruning– in fact, most of the time, pruning out the 4 D’s is all that is needed.
    Over pruning encourages water spouts (suckering) and effects root growth, growth that is essential to surving harsh climates.
  • Remove sucker growth from the base of the trunk and from the interior of the tree annually.
  • Any cuts that aren’t made flush to a trunk or branch should be made at least 2 cm (1”) above a bud and cut cleanly with sharp pruners or loopers.
  • Don’t stake a tree any longer than one year at which time it’s stable enough to stand on its own.
  • Keep mulch away from the trunk of the plant to prevent rot and rodent damage.
  • Use well-rotted manure, mulch or compost to nurture trees and shrubs placing it well away from the trunk or crown and concentrating it at the drip line. Over fertilizing with nitrites will inhibit flower budding and cause excess vegetative growth making plants vulnerable to pests. Over fertilized garden centre seedlings reared on chemicals may not survive normal planting conditions.

Pruning Trees (apple, pear)

Full Size Standard Trees (under 10 years of age)

  • At maturity a pruned apple or pear tree should be Xmas tree shaped. Identify your central leader. Remove double leaders.
  • Choose your lowest branch – in the Haliburton Highlands make sure it is above the snow line (1 metre min.) to avoid ice damage and breakage. Now prune all branches below it.
  • Now prune according to the 4 Ds.
  • If there are multiple branches you may want to thin some out. You want the tree to be well balanced so choose main branches on all sides first. (mark with ribbon).
  • If you need to do further pruning, follow the branch to the trunk and cut on a 45 degree angle above the branch collar (to optimize healing). Avoid pruning branches larger than 8cm (3”). Prune out branches with wide or narrow crotches. The best crotch angle (roughly the 2 o’clock or 10 o’clock angle from the center of the tree). Wider angles can break when laden with fruit and narrower angles lead to bushy growth and fruit that is too high to pick.
    Prune back any lower branches that arch and grow taller than the central leader.
  • You can choose at this last stage to give the tree an overall haircut by heading back the long gangly stems to encourage shorter, stouter branches. Cut back 20-30% of last year’s growth. (Avoid creating bushy starbursts in unwanted places)
  • Thinning out young fruit: If you have a particularly prolific tree and are concerned that a branch laden with fruit will break and you want larger but fewer fruit and good flower bud development for the next season consider thinning out the fruit. Begin thinning the fruit early when it is 1.5 cm in diameter. Starting at one end of a branch remove fruit, leaving one fruit every 15 – 20 cm (6-8”). Any earlier and you might remove leaf buds by mistake. (This fruit thinning technique applies to pommes and stone fruits.)


Pruning Standard Trees

Check out our Heritage Apple Project here!


Pruning Stone Fruit Trees (plum, cherry, apricot)

Stone fruits are native to warmer areas of the world and growing them in Zone 4 is a challenge. They bloom earlier in the spring and can be damaged by our late frosts. They are shallow rooted, prone to drought and disease and harvest is delayed to allow for maximum sweetening. (The sugar content in stone fruit doesn’t increase after harvest.) If you like cherries try growing a Shrub Cherry instead of a tree. They are hardy and blight resistant.
Stone fruit trees are pruned in spring from bud swell to petal drop to avoid infection from canker disease. The central leader is cut to encourage an open vase shape for maximum light penetration.

Open Center Pruning


Notes on Trees

  • Although there are newer more cold hardy rootstocks of dwarf and semi-dwarf trees a ‘standard’ height tree will be dependably cold hardy and live for decades. If you’ve ever walked through an old abandoned orchard the trees left standing are standard height heritage apples.
  • A tree will develop a stronger, more extensive root system if it has a fuller crown. Limit pruning at the time of planting to structural training and the removal of damaged branches only. Any removal of branches will reduce the capacity of the tree to produce food in the leaves and provide energy for above and below ground growth.
  • In most soils, the vast majority of trees’ fibrous, absorbing roots are in the top eight inches of soil. Roots grow where conditions are best for root growth and where water and oxygen are available.
  • Taproots are very uncommon in mature trees. If taproots do develop, they usually will be forced into horizontal growth when they encounter bedrock or hard subsoils beneath the surface. The entire root systems of most trees can be found within three feet of soil. The spread of the root system however, can be very extensive, often extending 2-3 times the spread of the crown.

For more information go to: http://www.hardyfruittrees.ca/tutorials/2014/01/20/how-to-prune-a-fruit-tree
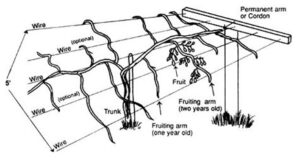
How To Prune Your Fruit Trees


Pruning Grapevines

Grapevines have to be aggressively pruned in order to yield any fruit. The vine will only produce fruit on the new branches of the year. If you let the vine make five meters of branches every year, after 3 years your vine will have to feed 15 meters of branches in order to reach the branch’s extremity where the fruit is.

Goals of Pruning

  1. To obtain multiple clusters of fruit
  2. To train the vine along a trellis, fence or conventional 2 wire structure.

When to Prune

Late fall or early spring

Types of Pruning

  1. To tame an overgrown Grapezilla
  2. Young plants and annual maintenance pruning

The Technique

  1. Choose the main stem. It is the strongest stem that comes out of the ground. Then cut all the other stems coming out of the ground, just above the ground.
  2. On the main stem, you will have to choose 4 branches. Choose the two strongest branches from both the left and right sides. If supporting your vines with two parallel wires (like shown in the image below) choose your branches so that each of them will easily hang on the wire. Using flagging tape is a great help in identifying the branches to keep. It will also help you to avoid cutting the good branches.
  3. Cut all the branches, except for the 4 chosen, to 1cm from the main stem.
  4. Finally, on each of the 4 branches, keep two buds and cut off the branch between the second and third bud.

Pruning Grapevines


About Kiwi

  • Male and female flowers are born on different plants, so both males and females must be planted in roughly a 1:6 ratio of males to females.
  • The plants often take several years to mature and usually do not bear fruit until they are 5 to 9 years old.
  • Although the plants are extremely winter hardy–tolerating temperatures as low as -30°F–they develop shoots early in the spring that are extremely sensitive to frost. In most years, there may be some shoot “burning” due to frost, although the plant usually survives, regrows, and fruits. If flowers are frosted, fruit will not develop that year.
  • Hardy kiwi are extremely vigorously growing vines that require a substantial supporting trellis.

Kiwi Trellis


Pruning Kiwi Vine the First Year

  1. For the first year focus on straight growth and a strong framework. Tie the vine loosely to the post and keep it growing straight upward. Don’t allow it to twirl around the post. Remove all side branches until the vine reaches the top of the post.
  2. Cut out the top of the vine a few inches below the top of the post and encourage side shoots that grow laterally along the wires. Winter is the best time for pruning kiwi vine side branches along the wires. Cut them back to a point where the stems are about 1/4-inch in diameter. If the vine didn’t form good side branches at the top, cut the main trunk back by about 2 feet and try again next year.
  3. After the first year, focus on building strong lateral growth along the wires. Lead the branches near the top of the vine to the wires and fasten them in place every 18 to 24 inches. Cut the vine to keep it from extending beyond the wires. Remove shoots that are twisting around other shoots or taking off in the wrong direction.

Kiwi Pruning


How to Prune an Overgrown Kiwi

  1. Remove all of the branches that wind around the kiwi trellis. Also, remove vine sections wound around other branches or nearby plants. Using sharp, sterilized pruners make a clean cut about one inch (2.5 cm.) from the main vine.
  2. The next step is to trim out cross branches. This includes branches growing over or crossing other branches. Also, trim out shoots growing straight out from the stem since these will not bear fruit.
  3. Select a principal stem for the kiwi vine and train this straight up a trellis. It should get some 6 feet long. Just beyond this point, allow two lateral side shoots to grow over the trellis. Prune these back to three buds, then remove all other lateral shoots.

Read more at Gardening Know How: https://www.gardeningknowhow.com/edible/fruits/kiwi/pruning-kiwi-vines.htm
https://extension.psu.edu/hardy-kiwi-in-the-home-fruit-planting

Filed Under: Gardening for Guilty Pleasure, Planning and Design, Pruning and Other Practices

Components of Soil

December 19, 2025

Mineral soils consist of four major components:

1. Mineral Materials

  • sand, silt and clay are the 3 major components of the mineral fraction of soil
  • they account for 45%-50% of the total soil volume
  • sand and silt particles are derived from quartz and feldspar
  • gravel and sand can be seen with the naked eye
  • a magnifying glass is necessary to see silt particles
  • clay particles are derived from silica and aluminum oxides

2. Organic Matter

  • consists of dead and decaying plants and animals.
  • is critical for gardening success because:
  • improves the soil’s physical structure
  • holds and releases plant nutrients
  • increases the water holding capacity of the soil
  • increases beneficial organisms in the soil

3. Water and 4. Air

  • are found in the pore spaces between mineral and organic components
  • account for about 50% of total soil volume
  • are essential for the growth of plant roots and soil microbes
  • dissolve most plant nutrients

Soil porosity is a measure of the pore space volume of a given soil:

  • sandy soils have large pore spaces which promote rapid drainage of water and leaching of nutrients and organic matter
  • clay soils contain tiny pore spaces which may impede root growth and water drainage
  • increasing organic matter increases the soil’s porosity and capacity to hold water

Air is pushed out when water comes into the soil from precipitation or irrigation of groundwater. If air is unavailable to plant roots for too long, the plant suffers from lack of oxygen. Some water is used by plants, some is lost through evaporation, and some moves so deep into the soil the plant roots cannot reach it.

Soil Layers (Horizons)

Ontario soils have at least 3 distinct layers that differ in colour, texture, consistency, and structure.

1. Surface Soil

  • contains most of the organic matter and plant roots
  • provides most of the nutrients and water to plants

2. Subsoil

  • consists of small clay particles that are carried down by gravity and rainfall
  • is lower in organic matter
  • provides storage space for water and nutrients
  • helps regulate the soil temperature and air supply of plant roots

3. Parent Material

  • is made up of decomposed rock characteristic of the bedrock
  • influences the soil’s texture, fertility, acidity, and depth

Soil Structure

In each textural class there is a range in the amounts of sand, silt, and clay that can be present. Most surface soils in Ontario fall into five textural classes. Each class name indicates relative amounts of sand, silt and clay in the soil.

Soil Texture Pyramid


1. Silt loam

2. Loam

3. Silty clay loam

4. Sandy loam

5. Clay Loam

Filed Under: Pruning and Other Practices, Soil

Growing Food

April 25, 2025

So you’re a flower grower, not a vegetable grower? Did you know that vegetables are actually easier to grow, taste better than grocery store purchases and do not have poisons on or in them (unless you do it). The seeds are cheaper than nursery plants, though granted your produce will be more expensive than in-season store bought vegetables when you consider your time and energy spent – but much more satisfying to eat.

Fresh Carrots

Do not picture acres of row on row of vegetables which means you must harvest, clean, freeze and store vast quantities of produce. Eating cabbages, beans and potatoes until you turn green. No. Simply interplant only your favourites amongst your flowers. Perhaps a pepper or tomato plant. A few radishes, beets, swiss chard or red Russian kale. (In France I saw dill waving in the breeze interplanted with the flowers in the boulevards and rosemary hedges.)

Seed companies now sell many vegetables that grow only to mini sizes. You could even have little carrots in your planters so that you have pretty feathery green leaves. Consider that garlic is a companion plant to roses. Since the former must be planted in the fall you can get it into the ground when you hill up those roses. A 12 inch pot of mesclun (mixed lettuces) is very attractive and will supply you with plenty of salads. Just keep picking those outside leaves and remove any blossom stems.

Vegetables are healthy food. They are better tasting than lilac blossoms, violets and day lily flowers. But I must admit nasturtium leaves should be given a chance by dedicated vegetable growers.

Check out some of our articles on growing food and have fun!

Filed Under: Growing Food, Pruning and Other Practices, Tips, Vegetables

Gardening in the Highlands

October 6, 2023

As many northern gardeners will agree there are challenges to gardening in the highlands. The impulse to keep trying speaks to the doggedness and persistence of the type of character who make this region their home or cottage.     

As a gardener you’ll be up against: 

  • Long, cold winters with drying winds
  • Variable summers of hot dry or cool wet weather 
  • Short growing season and cool nights
  • Blackflies and mosquitoes
  • Nutrient poor and thin soils
  • No municipal water or limited well water
  • Pests like deer, bear, beaver, and turtles
  • Fewer sources of information for northern gardeners

There are benefits of gardening in the Highlands.  There are the spectacular views and the ready-made stunning natural backdrop to one’s garden.  You’re certain to have an upper story of native trees, an understory of native shrubs and herbaceous plants, and the contrast of a glittering lake, a burbling creek or an imposing rocky outcrop.

The Highlands are part of the Algonquin dome with the contour of the land sloping from a high point downwards to the east, west and south.  The northern part of the county, often called the Algonquin Park Region is marginally cooler, dominated by coniferous forests, and poorer soils.  The central and southern parts of the county called the Haliburton Slopes benefit from areas of underlying sedimentary limestone.  Limestone contains calcium which can neutralize acid and benefit plants.  If you happen to garden in one of these areas you have a bit of an edge.  In general however Haliburton soils are acidic with a ph. of 6 or less and that’s because the subsoil is composed of ground-up granite rock of the Precambrian shield.  

For information about growing zones please click here. 

Canada’s most recent Plant Hardiness Zone map takes a wide range of climate variables into account, like minimum winter temperatures, maximum temperatures, rainfall, snow cover, wind, and elevation. In Canada, there are 10 zones, which are numbered from 0 to 9. The higher the zone number, the warmer the climate.  Haliburton County is generally considered to be zone 4.

There may also be areas of exception or ‘micro climates’.  Factors that contribute to microclimates may be nearby bodies of water, presence of concrete or stone, slopes, soil type, vegetation, or structures.  For example, plantings close to a house that are sheltered from northern winds will do well so you might experiment with a plant rated for a warmer zone, like a zone 5.  Read the plant tags when you are buying new plants to ensure they will survive year after year. 

Beware of imported plants that have the US hardiness zone information on the tags. This is not equivalent to Canadian hardiness zones. As a general rule of thumb gardeners can simply add one zone to the designated USDA zone. For example, USDA zone 4 is roughly comparable to zone 5 in Canada. Buying locally and asking questions at your local garden centre will help alleviate this confusion.

If you want to overwinter perennials outdoors in containers, it’s best to sink them into the ground.  This will protect your planter and the plants.

Filed Under: Garden with Nature, Growing Food, Invasives, Native Plants, Native Plants & Native Shorelines, Pruning and Other Practices, Wildlife

Invasive Species

May 25, 2023

A species is considered invasive if it has been introduced into the environment where it is not native and that has since become a nuisance through rapid spread, often to the detriment of native species. Invasive species arrived in Ontario generally through people who moved here and brought them from their native country. Information on six particular invasive species can be found below and under the Three Invasive Species Article.

Goutweed is considered invasive.

Beware of Invasive Plants

There is perhaps a tendency to mistakenly think of plants as being “rooted in place”. However, their ever increasing ability to travel through direct and indirect human assistance to new habitats both near and far can be a blessing or a curse…depending upon just how successful they are in relocating and the resulting threat that success creates in displacing natural vegetation.

A plant that succeeds at the expense of natural or cultivated vegetation soon becomes identified as an “Invasive Species”. Invasive species are plants that are alien to their new habitat and have biological characteristics such as strong root and reproductive systems and vigorous growth habit that allow them to out- compete and eventually threaten the viability of native or cultivated plants. This can result in reduced biodiversity and alteration of natural habitats that then impact negatively on both native flora and fauna. Native species can be deemed invasive if changing environmental circumstances allow them to overtake other native species within their habitat such as the case with the Manitoba maple which in many areas of Canada is now considered an undesirable “weed tree”.

Invasive species tend to be most problematic in areas that have been “disturbed” through human activity. They become very difficult to control or eradicate through natural means and when the threat to native plant and animal populations, successful cultivation of cash crops or human enjoyment of natural areas is heightened, they become the focus of programs aimed at eradication or at least limiting their spread to other areas.

It is the responsibility of all gardeners to be aware of the “invasive status” of any plant they bring into their gardens and to ensure they do not inadvertently contribute to increasing the level of threat these invasive species bring to the health of our natural species and habitats.

View full article discussing Garlic Mustard, Bindweed and Dog Strangling Vine. While there hasn’t been a sighting of Dog Strangling vine in the highlands it has been located as far north as Bobcaygeon. Be on the lookout and eradicate it early before it becomes a problem.


For a more information about invasive species visit the Ontario Invasive Plant Council.

Download the Northern Ontario Grow Me Instead guide here.

Filed Under: Garden with Nature, Invasives, Native Plants & Native Shorelines, Pests, Wildlife

Deer Me…

April 15, 2023

Deer In Winter

DEER PROOFING STRATEGIES

Many gardeners have their own deer-proofing ideas ~ from the bar of soap hanging from a tree to the group of aluminum foil plates or cds waving in the breeze. While some of these may work from time to time, for a while, there are other strategies that may have a longer lasting effect.

FENCING

Whitetail deer can jump at least 10 ft. (3 m) but an 8 ft. (2.5 m) fence should be ok; depending on the width of the garden. Expensive but reliable.

CHEMICAL DETERRENTS

For example, Coyote urine or various home-made recipes to spray on the leaves which can be found on the internet.
Recipes are based on combinations containing any of egg and/or milk with oil and a dash of dish detergent. Enhance with your choice of garlic or hot pepper sauce then age to disgusting (putrescent) and filter.
Commercial Products like Plantskydd and Bobbex do work if applied diligently and rotated. However, they are expensive.

It has been suggested that deer don’t like fuzzy leaves but they will, for example, eat Lambs Ears. They also may not like aromatic plants but have been known to eat Artemesia. Often deer won’t eat prickly plants although they seem to like Rosebushes.
Stinging Nettle and Thistles might be good to grow!
Native Plants have survived…
Deer will try anything once.

They prune apple trees and also eat all the apples they can reach.

Deer Eating Apples

Deer RESISTANT Plants

  • Allium (Allium spp.)
  • Bee Balm/Bergamot (Monarda)
  • Blazing Star (Liatris)
  • Bleeding Heart (Dicentra spectabilis)
  • Brown/black eyed Susans (Rudbeckia)
  • Butterfly weed (Asclepias)
  • Cleome (Cleome)
  • Coneflower (Echinacea)
  • Cosmos (Cosmos)
  • Daffodils (Narcissus spp.)
  • Dead Nettle (Lamium)
  • Delphinium (Delphinium)
  • Foxglove (Digitalis)
  • Globe Thistle (Echinops)
  • Goldenrod (Solidago)
  • Iris (Iris)
  • Lady’s Mantle (Alchemilla)
  • Lavender (Lavendula)
  • Lupins (Lupinus)
  • Marigolds (Tagetas)
  • Monkshood (Aconite)
  • Nicotiana (Nicotiana)
  • Peonies (Paeonia Lactiflora)
  • Shasta Daisy (Laucanthemum)
  • Valerian (Valeriana officinalis)
  • Ferns, Grasses & Sedges
  • Rhubarb (Rheum rhubarbarum)
  • Highbush Cranberry (Viburnum)
  • Juniper (Juniperas)
  • Lilacs (Syringa vulgarism)
  • Spruce (Picea)

FAVOURITE Deer Plants

Deer have distinct preferences. The plants listed below are particular favourites of deer and may draw them into your garden. Unfortunately our favourites are often deer favourites!

Trees, Shrubs, Vines

  • Apples (Malus)
  • White Cedar (Arborvitae)
  • Azaleas (Rhododendron spp.): Both deciduous & evergreen
  • Roses (Rosas)
  • Sumac (Rhus typhina)

Vegetable Garden Plants

  • Beans (Phaseolus spp.)
  • Blackberries, Raspberries (Rubus spp.)
  • Broccoli, Cabbage, Cauliflower (Brassica spp.)
  • Lettuce (Lactuca spp.)
  • Peas (Pisum satirum)
  • Strawberries (Fragaria spp.)
  • Sweet Corn (Zea mays spp.)

Herbaceous Ornamentals

  • Dahlias (Dahlia spp.)
  • Daylillies (Hemerocallis spp.)
  • Hostas (Hosta spp.)
  • Impatiens (Impatiens spp.)
  • Pansies (Viola x wittrockiana)
  • Phlox (Phlox spp.)
  • Spring Bulbs: Crocus (Crocus spp.) Tulips (Tulipa spp.)

Filed Under: Pests, Wildlife

  • Page 1
  • Page 2
  • Page 3
  • Go to Next Page »

coordinator@haliburtonmastergardener.ca

privacy policy

Haliburton County Development Corporation logo


HCMG logo
Member Login
  • Ask a Question
  • Resources
  • About
  • News & Events

Follow us on YouTube badge

  • Newsletter Signup
  • Contact
  • Buy Local

© 2026 HaliburtonMasterGardener.ca   •   Website Development by TechnicalitiesPlus Inc.